# Vue 周边
# 一、Vue 中的 ajax
# 1.1 使用 axios 并解决跨域
前端ajax技术大多是基于XMLHttpRequest的(这一节的 ajax 以及跨域可以看之前的文章),我们这一节要使用的axios (opens new window)就是对 XMLHttpRequest 进行了封装。使用npm i axios来局部安装它,然后使用import axios from "axios"引入到组件中,最后使用它来发送 HTTP 请求,来请求已经部署在本地5000端口的后端项目。
<template>
  <div class="student">
    <h3>姓名:{{ name }}</h3>
    <h3>年龄:{{ age }}</h3>
    <button @click.stop="getStudentInfo">获取学生信息</button>
  </div>
</template>

<script>
import axios from "axios";
export default {
  name: "Student",
  data() {
    return {
      name: "张三",
      age: 18,
    };
  },
  methods: {
    getStudentInfo() {
      // 使用axios进行HTTP请求
      axios.get("http://localhost:5000/students").then(
        (response) => {
          console.log("响应数据", response.data);
        },
        (error) => {
          console.log("请求失败", error.message);
        }
      );
    },
  },
};
</script>
2
3
4
5
6
7
8
9
10
11
12
13
14
15
16
17
18
19
20
21
22
23
24
25
26
27
28
29
30
31
32
33
在页面点击发现浏览器控制台报has been blocked by CORS policy这样的错误,这是因为本 Vue前端项目部署在http://localhost:8080/,而请求的后端接口是http://localhost:5000/students,同域名同协议但不同端口号了,这是跨域问题。
我们知道axios的底层 XMLHttpRequest 是支持CORS这个跨域解决方案的,并且在使用 axios 时是自动为我们设置了请求头里的Origin字段,但是我们现在部署在本地的后端项目没有处理响应头的Access-Control-Allow-Origin字段,也就是说前端支持 CORS 但后端项目还暂不支持 CORS。可以看下面我截取的部分 request 请求头和 response 响应头。
// 请求头部信息,有Origin
Accept: application/json, text/plain, */*
Accept-Encoding: gzip, deflate, br
Accept-Language: zh-CN,zh;q=0.9
Connection: keep-alive
Host: localhost:5000
Origin: http://localhost:8080
Referer: http://localhost:8080/

// 响应头部信息,没有Access-Control-Allow-Origin
Connection: keep-alive
Content-Length: 110
Content-Type: application/json; charset=utf-8
Date: Fri, 17 Sep 2021 19:29:25 GMT
ETag: W/"6e-wHidWjXg0dVzHrIzAITIYLJBAfc"
X-Powered-By: Express
2
3
4
5
6
7
8
9
10
11
12
13
14
15
16
解决这个问题的方法:要么修改后端代码去设置响应头部的Access-Control-Allow-Origin,要么给前端配一个代理服务器进行请求的转发。这里我们就选择使用Vue Cli给我们提供的代理服务器。打开前端项目根目录下的vue.config.js,在里面写上如下配置,保存好后重启项目。
module.exports = {
  // 开启代理服务器,proxy的值就是服务器地址,也就是请求转发地址
  devServer: {
    proxy: "http://localhost:5000",
  },
};
2
3
4
5
6
配置好代理服务器后,项目中使用 axios 的地方,请求的地址的端口必须换成8080,也就是将http://localhost:5000/students改为http://localhost:8080/students,这是因为现在代理服务器处于和本前端项目部署端口一致都是8080。最后,在页面点击按钮,就能正常获取到接口返回的数据了。
上面这种配置代理的方式会有两个限制,一是不能配置多个代理;二是,因为代理服务器与本项目部署使用端口号一样,那请求资源时其实会先从本项目的public下寻找资源,找不到才会去被代理地址寻找资源。其实Vue Cli还有另外一种代理服务器的配置。
module.exports = {
  // 开启代理服务器
  devServer: {
    proxy: {
      api: {
        target: "http://localhost:5000",
        pathRewrite: { "^/api": "" },
      },
      "/myApi": {
        target: "http://localhost:5000", // 请求转发地址
        pathRewrite: { "^/myApi": "" }, // 匹配'/myApi'开头的请求地址,将'/myApi'替换为''
        // ws: true, // 是否支持WebSocket
        // changeOrigin // 是否让请求头的host与服务器地址保持一致
      },
    },
  },
};
2
3
4
5
6
7
8
9
10
11
12
13
14
15
16
17
这种代理服务器配置方式可以配置多个代理服务器,然后因为它可以是有接口名前缀,是用于区分前端public里的资源还是后端资源,但在前端项目进行请求时中记得加上这些前缀,比如http://localhost:8080/myApi/students。
# 1.2 用户搜索案例
我们使用axios去请求一个 GitHub 提供的公共接口,它返回一个用户列表信息。我们需要制作两个组件,一个搜索区域,一个展示列表区域(为了演示没有将 item 拆出来)。然后还要给它制作一个简单提示,例如“欢迎来到 xxx”、“正在加载中”、“请求错误”等。
父组件App.vue:
<template>
  <div><HubSearch /><HubUserList /></div>
</template>

<script>
import HubSearch from "./components/HubSearch.vue";
import HubUserList from "./components/HubUserList.vue";
export default {
  name: "App",
  components: { HubUserList, HubSearch },
};
</script>
2
3
4
5
6
7
8
9
10
11
12
搜索区域HubSearch.vue:
<template>
<div class="search-outer">
<h3 class="search-input">Search Github Users</h3>
<div>
<input type="text" placeholder="enter the name you search" v-model="keyWord" /> <button @click="getUserList">
Search
</button>
</div>
</div>
</template>
<script>
import axios from "axios";
export default {
name: "HubSearch",
// keyWord是输入框里的内容,isFirst是否第一次使用
data() {
return {
keyWord: "",
isFirst: true,
};
},
methods: {
getUserList() {
// 输入框没有内容就返回
if (!this.keyWord) return;
// 只第一次才去触发changeNoFirst事件,后面无需再管理isFirst
if (this.isFirst) {
this.isFirst = false;
// 通知HubUserList组件,开始搜索了,把欢迎页面撤掉
this.$bus.$emit("changeNoFirst", this.isFirst);
}
// 通知HubUserList组件,用户点了搜索,页面换成“正在加载”
this.$bus.$emit("requestLoading", true);
// 使用axios进行接口请求
axios.get(`https://api.github.com/search/users?q=${this.keyWord}`).then(
(response) => {
console.log("请求成功:", response);
if (response.data != null) {
// 通知HubUserList组件,将用户信息传给它,并且把“正在加载”撤掉换成用户列表页面
this.$bus.$emit("getUserInfo", response.data);
}
},
(error) => {
console.log("请求失败:", error);
if (error && error.message) {
// 通知HubUserList组件,将错误信息传给它,并且把“正在加载”撤掉换成错误展示页面
this.$bus.$emit("requestFailed", error.message);
}
}
);
},
},
};
</script>
2
3
4
5
6
7
8
9
10
11
12
13
14
15
16
17
18
19
20
21
22
23
24
25
26
27
28
29
30
31
32
33
34
35
36
37
38
39
40
41
42
43
44
45
46
47
48
49
50
51
52
53
54
55
用户列表展示区域HubUserList.vue:
<template>
  <div class="row">
    <h1 v-if="isFirst">欢迎使用!</h1>
    <div v-if="!isFirst">
      <h1 v-show="errorMsg">搜索失败,错误信息是:{{ errorMsg }}</h1>
      <h1 v-show="isLoading">正在加载...</h1>
      <div class="card" v-show="!isLoading" v-for="userItem in userList" :key="userItem.login">
        <a :href="userItem.html_url" target="_blank">
          <img :src="userItem.avatar_url" style="width: 100px" />
        </a>
        <p class="card-text">{{ userItem.login }}</p>
      </div>
    </div>
  </div>
</template>

<script>
export default {
  name: "HubUserList",
  data() {
    return {
      isFirst: true,
      isLoading: false,
      errorMsg: "",
      userList: [],
    };
  },
  mounted() {
    // 接收HubSearch组件的通知,用户开始搜索,撤掉欢迎页面
    this.$bus.$on("changeNoFirst", (bool) => {
      this.isFirst = bool;
    });
    // 接收HubSearch组件的通知,用户列表信息拿到了,撤掉“正在加载”页面,换上信息列表页面
    this.$bus.$on("getUserInfo", (userInfo) => {
      if (userInfo) {
        // 正在加载状态更改为加载完毕
        this.isLoading = false;
        // 校验,然后再保存信息
        if (userInfo.items && userInfo.items.length) this.userList = userInfo.items;
      }
    });
    // 接收HubSearch组件的通知,用户开始搜索,换上“正在加载”页面
    this.$bus.$on("requestLoading", (bool) => {
      this.isLoading = bool;
      // 上一的请求可能发生过,这次开始请求就将错误信息清空
      if (this.errorMsg) this.errorMsg = "";
    });
    // 接收HubSearch组件的通知,请求出错,撤掉“正在加载”换上错误展示信息页面
    this.$bus.$on("requestFailed", (errorMsg) => {
      if (errorMsg) {
        this.errorMsg = errorMsg;
        // 请求完成了,虽然发生了错误,加正在加载状态改为加载完毕
        this.isLoading = false;
      }
    });
  },
};
</script>

<style scoped>
.card {
  float: left;
  width: 33.333%;
  padding: 0.75rem;
  margin-bottom: 2rem;
  border: 1px solid #efefef;
  text-align: center;
}

.card > img {
  margin-bottom: 0.75rem;
  border-radius: 100px;
}

.card-text {
  font-size: 85%;
}
</style>
2
3
4
5
6
7
8
9
10
11
12
13
14
15
16
17
18
19
20
21
22
23
24
25
26
27
28
29
30
31
32
33
34
35
36
37
38
39
40
41
42
43
44
45
46
47
48
49
50
51
52
53
54
55
56
57
58
59
60
61
62
63
64
65
66
67
68
69
70
71
72
73
74
75
76
77
78
# 1.3 Vue Resource
Vue Resource也是对 XHR 进行了封装,但它在Vue1.0 版本用得比较多,在工作中可能还会遇到这种技术,所以简单了解一下。使用npm i vue-resource进行局部安装,然后在main.js中引入它,再使用插件的形式将他增加到 Vue 原型上:
import Vue from "vue";
import App from "./App.vue";
import vueResource from "vue-resource";

Vue.use(vueResource);

new Vue({
  el: "#app",
  render: (h) => h(App),
  components: {
    App,
  },
  beforeCreate() {
    Vue.prototype.$bus = this;
  },
});
2
3
4
5
6
7
8
9
10
11
12
13
14
15
16
后续的使用同 axios
# 二、Vuex
# 2.1 Vuex 介绍
Vuex是一个插件,在项目中用Vue.use(xxx)添加到 Vue 上。Vuex 的作用是,集中管理多个组件的共享状态(共用数据),它适用于任意组件间的通信。
那么Vuex与自定义事件的使用场景区别:
- 只涉及个别组件,比如只有一对父子组件之间要进行简单的通信,就可以使用自定义事件。
- 涉及的组件稍多点,比如一个父组件多个子组件,那就可以使用全局事件总线。
- 涉及的组件多并且层级复杂,那么使用Vuex会比较合适。
上面第三点关于全局事件总线不适用的详细说明:
一旦通信的组件多而且组件间的层级很复杂时,共享数据的读取会非常的不方便。共享数据的读取,第一种方式是使用props 传参,第二种方式用得少,组件各自存相同的数据,谁的数据变化了谁就使用$emit通知对方也同时更新。这两种方式在刚刚那个条件下都有缺点:第一种方式的缺点是会产生多层的 porps 传递,比如爷组件传给孙组件,就要经过父组件,可能父组件都没有实质性地用到该数据;第二种方式的缺点就是数据各自维护,表面是数据共享,实质只是数据相同,所以全局事件总线基本上都是用 props 进行共享数据的读取。
而Vuex应对这种场景就非常擅长了,它会将组件共享数据提取出来放在一起进行集中式管理,也会将修改数据的方法提取出来放在一起集中式管理,所以你不管是读还是改都会非常的方便。所谓集中式管理,就是把以前的“事件回调函数”从它们原本的组件中抽离出来,也就是不写在组件内部了,同样的,共享数据的定义也不在组件内部定义了,也全部抽离出来。放在哪?下面的Vuex 工作原理图会接着说。
Vuex 工作原理图:
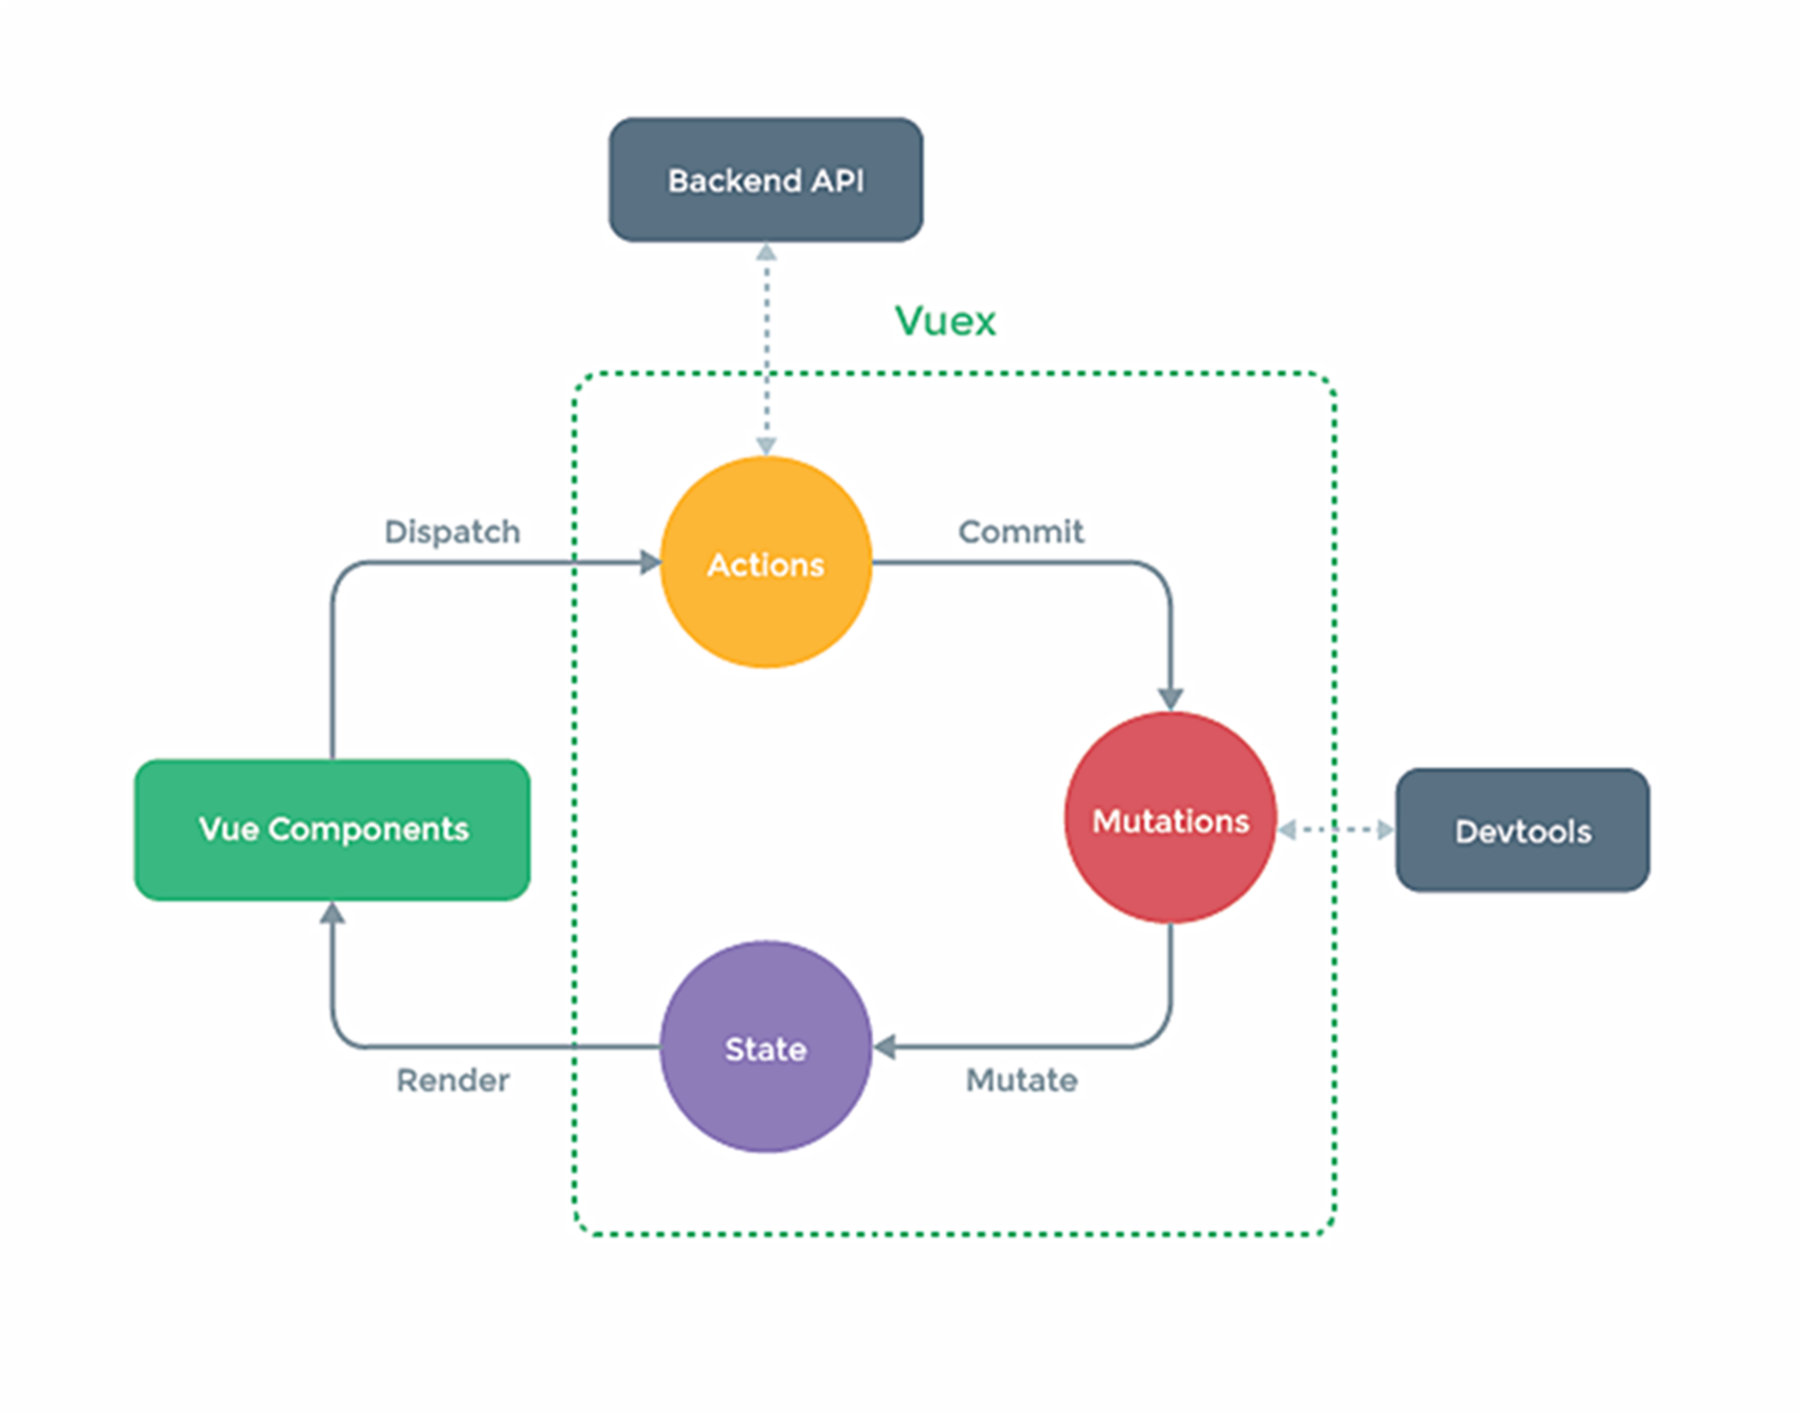
- Store:图中的虚线框是 Vuex,它其实有个隐藏着的Store,Vuex 在我们项目中具现化的就是这个Store,它实际管理着 State、Mutation 和 Action。
- State:它是 Vuex 中的唯一数据源,存储并集中管理着多个组件的共享数据(状态)。
- Mutation:它存放并集中管理着修改 State 数据的方法。这里的“方法”,与全局事件总线中的回调函数非常类似,都用于修改共享数据。
- Action:它存放并集中管理着含有异步操作的方法,Mutation里存的只能是同步的方法。所以Action里的方法可以用来请求接口、设置定时器等。
在提取业务代码时,可以将独特的逻辑留在组件了,把大部分公共业务逻辑代码放到 Action 里,Mutation 只放最最公共的业务逻辑或者简单的数据修改。
# 2.2 搭建 Vuex 环境
先使用npm i vuex在项目中局部安装 Vuex,然后在项目根目录下新建store目录,并在该目录下新建index.js文件。用于存放store 相关代码,也是用于集中管理State 里的数据、Mutation 里的方法以及 Action 里的方法。
import Vue from "vue";
import Vuex from "vuex";
/*
  必须在Vuex.Store实例化之前将Vuex功能添加到Vue里,否则会报
  `[vuex] must call Vue.use(Vuex) before creating a store instance.`
  原因是Vuex.Store的内部用到了经过Vue.use(Vuex)增强后的Vue。
*/
Vue.use(Vuex);

// 虽然Vuex功能添加进来了,但它还需要具象化,也就是需要对Vuex.Store进行实例化
// 实例化同时,为state、mutations、actions开辟空间,便于集中管理
export default new Vuex.Store({
  state: {
    // 开辟空间,集中管理共享数据
  },
  actions: {
    // 开辟空间,集中管理异步方法
  },
  mutations: {
    // 开辟空间,集中管理同步方法
  },
});
2
3
4
5
6
7
8
9
10
11
12
13
14
15
16
17
18
19
20
21
22
将导出的 Store 实例放在 Vue 配置对象的名为store属性上,是为了让每个组件都能使用 store。main.js代码如下:
import Vue from "vue";
import App3 from "./App3.vue";
import store from "./store/index";

new Vue({
  el: "#app",
  render: (h) => h(App3),
  // 在这里放入Store实例,那么每个组件里都能使用`this.$store`访问了
  store,
  components: { App3 },
});
2
3
4
5
6
7
8
9
10
11
# 2.3 Vuex 的基本使用
我们先准备一个基础版的 Count 组件,有各种求和功能,代码如下。
<template>
  <div>
    <h2>当前和为:{{ sum }}</h2>
    <select v-model.number="num">
      <option value="1">1</option>
      <option value="2">2</option>
      <option value="3">3</option>
    </select>
    <button @click="increment">加{{ num }}</button>
    <button @click="decrement">减{{ num }}</button>
    <button @click="incrementOdd">当前和为奇数时再加{{ num }}</button>
    <button @click="incrementWait">等一等再加{{ num }}</button>
  </div>
</template>

<script>
export default {
  name: "Count",
  data() {
    return {
      num: 1,
      sum: 0,
    };
  },
  methods: {
    increment() {
      this.sum += this.num;
    },
    decrement() {
      this.sum -= this.num;
    },
    incrementOdd() {
      if (this.sum % 2 === 0) return;
      this.sum += this.num;
    },
    incrementWait() {
      setTimeout(() => {
        this.sum += this.num;
      }, 1000);
    },
  },
};
</script>

<style>
button {
  margin-left: 5px;
}
</style>
2
3
4
5
6
7
8
9
10
11
12
13
14
15
16
17
18
19
20
21
22
23
24
25
26
27
28
29
30
31
32
33
34
35
36
37
38
39
40
41
42
43
44
45
46
47
48
49
我们需要将sum提取到state里,然后将各种求和的方法提取到actions和mutations里。尽量把公共的复杂的业务逻辑和异步操作放到actions里,把最最公共的业务逻辑和最简单的 state数据变更放到mutations里。
index.js:
import Vue from "vue";
import Vuex from "vuex";
import { addWait, addOdd } from "./actions-types";
import { COUNT_ADD, COUNT_SUBTRACT } from "./mutation-types";

Vue.use(Vuex);

export default new Vuex.Store({
  state: { sum: 0 },
  actions: {
    // 异步方法,context具有store大部分属性和方法,value是提供的相关新数据
    [addWait](context, value) {
      setTimeout(() => {
        context.commit(COUNT_ADD, value);
      }, 1000);
    },
    // 公共的复杂的业务逻辑放到actions里。简单数据变更就放到mutations里
    [addOdd]({ state, commit }, value) {
      if (state.sum % 2) commit(COUNT_ADD, value);
    },
  },
  mutations: {
    // state就是共享数据,value是提供的相关新数据
    [COUNT_ADD](state, value) {
      state.sum += value; // 只是简单的数据变更,如果有复杂的逻辑就抽到actions里
    },
    // state就是共享数据,value是提供的相关新数据
    [COUNT_SUBTRACT](state, value) {
      state.sum -= value;
    },
  },
});
2
3
4
5
6
7
8
9
10
11
12
13
14
15
16
17
18
19
20
21
22
23
24
25
26
27
28
29
30
31
32
使用 store 过后的Count.vue:
<template>
  <div>
    <!-- 使用共享数据sum -->
    <h2>当前和为:{{ $store.state.sum }}</h2>
    <select v-model.number="num">
      <option value="1">1</option>
      <option value="2">2</option>
      <option value="3">3</option>
    </select>
    <button @click="increment">加{{ num }}</button>
    <button @click="decrement">减{{ num }}</button>
    <button @click="incrementOdd">当前和为奇数时再加{{ num }}</button>
    <button @click="incrementWait">等一等再加{{ num }}</button>
  </div>
</template>

<script>
import { addWait, addOdd } from "../store/actions-types";
import { COUNT_ADD, COUNT_SUBTRACT } from "../store/mutation-types";
export default {
  name: "Count",
  data() {
    // 把sum提取到state
    return { num: 1 };
  },
  methods: {
    increment() {
      // 让mutations里的COUNT_ADD进行执行,并提供一个参数
      this.$store.commit(COUNT_ADD, this.num);
    },
    decrement() {
      // 让mutations里COUNT_SUBTRACT进行执行,并提供一个参数
      this.$store.commit(COUNT_SUBTRACT, this.num);
    },
    incrementOdd() {
      // 让actions里addOdd进行执行,并提供一个参数
      this.$store.dispatch(addOdd, this.num);
    },
    incrementWait() {
      // 让actions里addWait进行执行,并提供一个参数
      this.$store.dispatch(addWait, this.num);
    },
  },
};
</script>

<style>
button {
  margin-left: 5px;
}
</style>
2
3
4
5
6
7
8
9
10
11
12
13
14
15
16
17
18
19
20
21
22
23
24
25
26
27
28
29
30
31
32
33
34
35
36
37
38
39
40
41
42
43
44
45
46
47
48
49
50
51
actions 里的方法的第一个形参context,有这些属性:commit、dispatch、getters、rootGetters、rootState、state。它如此设计目的是,能在 actions 的方法里面进行非常复杂的操作,例如组合使用 actions 里的方法,再例如连续使用 Promise,再例如根据 state 数据的值来确定是进行异步还是继续 commit 等。
mutations 里的方法的第一个形参state,最好只做一些简单判断和修改值,它给你只提供了state,所以也没法进行非常复杂的业务判断(当然也别想着进行异步操作)。使用 Vue DevTools 可以查看 mutations 和 state,却看不了 actions。
# 2.4 getters
多个组件在使用 state 数据时,可能需要进行一些处理,比如过滤操作,那么在组件各自的computed去做计算属性,让计算属性去依赖 state 数据。大部分确实是这么做的也应该这么做,如果多个组件的处理逻辑一样呢?那代码是不是重复了?
其实可以使用 Vuex 的getters(与state平级),它将多个组件里共用的计算属性提取到getters的属性上,这些属性实际上是依赖于某个state 数据。只要state 数据变化了,对应依赖它的getters就会随之变化。
你可以看到那 store 里的getters,和组件里的计算属性非常的像,它们的区别是,store 里的getters只有 getter 而没有 setter,而组件的计算属性即拥有 getter 也拥有 setter。
// 某个组件的计算属性,依赖于一个state数据,做一个过滤的操作
computed: {
  doneTodosCount () {
    return this.$store.state.todos.filter(todo => todo.done).length
  }
}
2
3
4
5
6
如果多个组件都使用过滤的逻辑,就可以提取到 store 的getters里形成复用:
// 在store里添加getters配置项,用于存储公共的“计算属性”
const store = new Vuex.Store({
  state: {
    todos: [
      { id: 1, text: "...", done: true },
      { id: 2, text: "...", done: false },
    ],
  },
  getters: {
    // 相当于store的计算属性的getter方法,并且它还是公共的,能被很多组件访问
    doneTodos: (state) => {
      return state.todos.filter((todo) => todo.done);
    },
  },
});
2
3
4
5
6
7
8
9
10
11
12
13
14
15
虽然getters的属性是只有 getter 没有 setter,但是他有一个非常重要的扩展功能,那就是可以接收参数,按照参数来进行逻辑处理。比如按照参数来过滤列表。虽然getters是多处复用的,代码都一样,但我还是想传点参数可以进行业务判断。
// store里的getters,如果接收另外的参数,相当于返回一个函数
getters: {
  // getTodoById在被子组件使用时,可接收一个参数,用于对公共数据todos进行特定值的寻找
  getTodoById: (state) => (id) => {
    return state.todos.find((todo) => todo.id === id);
  };
}

// 子组件使用处,既然你返回的是一个函数,那我就可以对它进行传参,进行特定的处理逻辑
store.getters.getTodoById(2); // -> { id: 2, text: '...', done: false }
2
3
4
5
6
7
8
9
10
# 2.5 辅助函数——快速生成属性和方法
前面一节里,我们通常将 state 数据使用组件的计算属性来接收,这样反常方便的在模板中使用(减少了$store.state.这两层访问)。
一旦组件里使用的 state 数据过多,那每次都要在computed手动生成对应的计算属性,非常的不方便。我们可以使用mapState辅助函数,帮助我们快速的自动的生成对应的计算数据。当然,既然 state 数据可以使用mapState进行快速生成,getters 也可以使用对应的mapGetters进行快速生成。
mapState和mapGetters的入参可以是对象也可以是数组。如果是对象,那表示 state 数据名和本组件计算属性名不一样;如果是数组,那表示 state 数据名和本组件计算属性名一致。
mapState和mapGetters的返回值是一个对象,该对象里的所有属性名就是刚刚说的传参数据,我们需要将这个返回对象打散并放入本组件的computed里,具体是使用...展开符。
我们先准备一个store(store/index.js):
import Vue from "vue";
import Vuex from "vuex";
import { COUNT_ADD } from "./mutation-types";

Vue.use(Vuex);

export default new Vuex.Store({
  state: { sum: 0, name: "张三", age: 18 },
  getters: {
    smallSum: (state) => state.sum - 10,
    middleSum: (state) => state.sum + 10,
    bigSum: (state) => state.sum * 10,
  },
  actions: {},
  mutations: {
    [COUNT_ADD](state, value) {
      state.sum += value;
    },
  },
});
2
3
4
5
6
7
8
9
10
11
12
13
14
15
16
17
18
19
20
未经过mapState和mapGetters优化的Count.vue:
<template>
  <div>
    <h2>{{ msg }},{{ na }},你的年龄是{{ ag }}吗?</h2>
    <h2>当前的和值为:{{ he }}</h2>
    <h2>当前和值减少后为:{{ smlSum }}</h2>
    <h2>当前和值增大后为:{{ midSum }}</h2>
    <h2>当前和值翻倍后为:{{ biSum }}</h2>
    <button @click="increment">加1</button>
  </div>
</template>

<script>
import { COUNT_ADD } from "../store/mutation-types";
export default {
  name: "Count",
  data() {
    return { msg: "你好呀" };
  },
  computed: {
    // 拿取store里的state数据,作为本组件的计算属性。并且还不能使用箭头函数进行简写
    he() {
      return this.$store.state.sum;
    },
    na() {
      return this.$store.state.name;
    },
    ag() {
      return this.$store.state.age;
    },
    // 拿取store里的getters属性,作为本组件的计算属性
    smlSum() {
      return this.$store.getters.smallSum;
    },
    midSum() {
      return this.$store.getters.middleSum;
    },
    biSum() {
      return this.$store.getters.bigSum;
    },
  },
  methods: {
    increment() {
      this.$store.commit(COUNT_ADD, 1);
    },
  },
};
</script>

<style>
button {
  margin-left: 5px;
}
</style>
2
3
4
5
6
7
8
9
10
11
12
13
14
15
16
17
18
19
20
21
22
23
24
25
26
27
28
29
30
31
32
33
34
35
36
37
38
39
40
41
42
43
44
45
46
47
48
49
50
51
52
53
经过mapState和mapGetters优化过的Count.vue:
<template>
  <div>
    <h2>{{ msg }},{{ na }},你的年龄是{{ ag }}吗?</h2>
    <h2>当前的和值为:{{ he }}</h2>
    <h2>当前和值减少后为:{{ smlSum }}</h2>
    <h2>当前和值增大后为:{{ midSum }}</h2>
    <h2>当前和值翻倍后为:{{ biSum }}</h2>
    <button @click="increment">加1</button>
  </div>
</template>

<script>
import { mapState, mapGetters } from "vuex";
import { COUNT_ADD } from "../store/mutation-types";
export default {
  name: "Count",
  data() {
    return { msg: "你好呀" };
  },
  computed: {
    // mapState和mapGetters的入参是个对象,如果state数据与组件计算属性不同名,就使用对象形式;如果同名就使用数组形式。
    // mapState和mapGetters的返回值是一个对象,必须使用`...`展开符将该对象属性合并到本组件的计算属性里
    ...mapState({
      he: "sum", // 将`he`映射为`this.$store.state.sum`
      na: "name", // 将`na`映射为`this.$store.state.name`
      ag: "age", // 将`ag`映射为`this.$store.state.age`
    }),
    ...mapGetters({
      smlSum: "smallSum", // 将`smlSum`映射为`this.$store.getters.smallSum`
      midSum: "middleSum", // 将`midSum`映射为`this.$store.getters.middleSum`
      biSum: "bigSum", // 将`biSum`映射为`this.$store.getters.bigSum`
    }),
    // ...mapState(["sum", "name", "age" ]), // 两边同名,可避免取名的烦恼。同名要以state里的变量名为主导
    // ...mapGetters(["smallSum", "middleSum", "bigSum" ]), // 两边同名,可避免取名的烦恼
  },
  methods: {
    increment() {
      this.$store.commit(COUNT_ADD, 1);
    },
  },
};
</script>

<style>
button {
  margin-left: 5px;
}
</style>
2
3
4
5
6
7
8
9
10
11
12
13
14
15
16
17
18
19
20
21
22
23
24
25
26
27
28
29
30
31
32
33
34
35
36
37
38
39
40
41
42
43
44
45
46
47
48
mapActions和mapMutations其实和上面的mapState和mapGetters类似。mapActions用于快速在本组件里生成与 actions 里对应的方法调用,mapMutations用于快速在本组件里生成与 mutations 里对应的方法调用。
它们生成的东西都放在methods里。如果你要使用它们生成的方法,在传参的时候非常值得注意,如果是在模板中使用那就必须得手动带上参数。
我们把2.3 Vuex 的基本使用的例子经过mapActions和mapMutations的优化,代码如下:
<template>
  <div>
    <!-- 使用共享数据sum -->
    <h2>当前和为:{{ $store.state.sum }}</h2>
    <select v-model.number="num">
      <option value="1">1</option>
      <option value="2">2</option>
      <option value="3">3</option>
    </select>
    <!-- 因为使用mapMutations和mapActions,在模板中必须手动传参 -->
    <button @click="increment(num)">加{{ num }}</button>
    <button @click="decrement(num)">减{{ num }}</button>
    <button @click="incrementOdd(num)">当前和为奇数时再加{{ num }}</button>
    <button @click="incrementWait(num)">等一等再加{{ num }}</button>
  </div>
</template>

<script>
import { mapActions, mapMutations } from "vuex";
import { addWait, addOdd } from "../store/actions-types";
import { COUNT_ADD, COUNT_SUBTRACT } from "../store/mutation-types";
export default {
  name: "Count",
  data() {
    return { num: 1 };
  },
  methods: {
    ...mapMutations({
      // 将`increment`映射为`this.$store.commit(COUNT_ADD)`,注意没有带上参数,必须在模板中手动添加入参
      increment: COUNT_ADD,
      // 将`increment`映射为`this.$store.commit(COUNT_ADD)`,注意没有带上参数,必须在模板中手动添加入参
      decrement: COUNT_SUBTRACT,
    }),
    ...mapActions({
      // 将`incrementOdd`映射为`this.$store.dispatch(addOdd)`,注意没有带上参数,必须在模板中手动添加入参
      incrementOdd: addOdd,
      // 将`incrementWait`映射为`this.$store.dispatch(addWait)`,注意没有带上参数,必须在模板中手动添加入参
      incrementWait: addWait,
    }),
  },
};
</script>

<style>
button {
  margin-left: 5px;
}
</style>
2
3
4
5
6
7
8
9
10
11
12
13
14
15
16
17
18
19
20
21
22
23
24
25
26
27
28
29
30
31
32
33
34
35
36
37
38
39
40
41
42
43
44
45
46
47
48
# 2.6 Vuex 模块化
我们不可能将所有业务的共享数据以及方法都放在一个 store 文件里,这会特别臃肿特别混乱导致难以维护,我们可以按照业务模块或功能对 store 进行拆分,将他们拆分成一个个模块,每个模块拥有自己的 state、mutations、actions、getters(模块内还能嵌套)。
// 拆分成一个模块A
const moduleA = {
  state: () => ({ ... }),
  mutations: { ... },
  actions: { ... },
  getters: { ... }
}
// 拆分成一个模块B
const moduleB = {
  state: () => ({ ... }),
  mutations: { ... },
  actions: { ... }
}
const store = new Vuex.Store({
  // 使用modules配置项将上面的模块放到Store中去
  modules: {
    a: moduleA,
    b: moduleB
  }
})
store.state.a // -> moduleA 的状态,注意,不是store.a.state
store.state.b // -> moduleB 的状态,注意,不是store.a.state
2
3
4
5
6
7
8
9
10
11
12
13
14
15
16
17
18
19
20
21
22
每个模块内的 mutations、actions、getters里的方法,它们的形参都是在本模块中是局部的。如果想在方法中访问全局的state 和 getters,1) getters里的方法的第三和第四形参是rootState和rootGetters;2) actions里的方法的形参 context 中有rootState和rootGetters。
const moduleA = {
  getters: {
    // state和getters这两个形参是局部的,rootState和rootGetters可以访问到根节点的state和getters
    sumWithRootCount(state, getters, rootState, rootGetters) {
      return state.count + rootState.count;
    },
  },
  actions: {
    // context中有rootState和`rootGetters,可以访问到根节点的state和getters
    incrementIfOddOnRootSum({ state, commit, rootState }) {
      if ((state.count + rootState.count) % 2 === 1) {
        commit("increment");
      }
    },
  },
};
2
3
4
5
6
7
8
9
10
11
12
13
14
15
16
上说的是模块里的方法的形参是在模块内部是局部的。而模块里的 state、actions、mutations 和 getters本身,在默认情况下是注册在全局命名空间的,这使得多个模块能够对同一 state、actions、mutations 和 getters 作出响应。
如果想让模块在使用 state、actions、mutations 和 getter 时要通过“模块名”来访问,那就可以给模块打开namespaced开关,那么modules的属性名就会作为模块的命名空间了。
下面这个例子,使用了模块化和命名空间,我们要熟悉 store 在组件内部是怎么使用的。使用mapState、mapGetters、mapActions、mapMutations写法是最简单的,只需要在形参列表里的第一个位置上加上模块名这个新参数即可;而原始写法就得特别注意了,state 是数据,一般this.$store.state.模块名.属性即可,而 getters、actions、mutations 里是方法,关键部位必须是"模块名/方法名"的形式。
store/index.js:
import Vue from "vue";
import Vuex from "vuex";
import countAbout from "./countAbout";
import personAbout from "./personAbout";

Vue.use(Vuex);

export default new Vuex.Store({
  // 使用modules将countStore和personStore放入Store
  modules: {
    countAbout,
    personAbout,
  },
});
2
3
4
5
6
7
8
9
10
11
12
13
14
store/personAbout.js:
import { changeAge } from "./actions-types";
import { PERSON_CHANGE_AGE, PERSON_CHANGE_ADDRESS } from "./mutation-types";
export default {
  // 开启命名空间
  namespaced: true,
  state: { name: "张三", age: 18, address: "武汉" },
  actions: {
    [changeAge](context, value) {
      setTimeout(() => {
        context.commit(PERSON_CHANGE_AGE, context.state.age + value);
      }, 1000);
    },
  },
  mutations: {
    [PERSON_CHANGE_AGE](state, value) {
      state.age = value;
    },
    [PERSON_CHANGE_ADDRESS](state, value) {
      state.address = value;
    },
  },
};
2
3
4
5
6
7
8
9
10
11
12
13
14
15
16
17
18
19
20
21
22
store/countAbout.js:
import { addWait, addOdd } from "./actions-types";
import { COUNT_ADD, COUNT_SUBTRACT } from "./mutation-types";
export default {
  // 开启命名空间
  namespaced: true,
  state: { sum: 0 },
  getters: { bigSum: (state) => state.sum * 10 },
  actions: {
    [addWait](context, value) {
      setTimeout(() => {
        context.commit(COUNT_ADD, value);
      }, 1000);
    },
    [addOdd]({ state, commit }, value) {
      if (state.sum % 2) commit(COUNT_ADD, value);
    },
  },
  mutations: {
    [COUNT_ADD](state, value) {
      state.sum += value;
    },
    [COUNT_SUBTRACT](state, value) {
      state.sum -= value;
    },
  },
};
2
3
4
5
6
7
8
9
10
11
12
13
14
15
16
17
18
19
20
21
22
23
24
25
26
Person.vue:
<template>
  <div>
    <h2>Count组件里的当前和值是:{{ sum }},放大十倍后:{{ bigSum }}</h2>
    <h2>下面是Person组件本身的内容:</h2>
    <h2>姓名:{{ name }}</h2>
    <h2>年龄:{{ age }}</h2>
    <h2>住址:{{ address }}</h2>
    <span>选择几年后:</span>
    <select v-model.number="years" @change="changeAge">
      <option value="5">5</option>
      <option value="8">8</option>
      <option value="12">12</option>
    </select>
    <span>搬家:</span>
    <select v-model="addre" @change="changeAddress">
      <option value="武汉">武汉</option>
      <option value="上海">上海</option>
      <option value="北京">北京</option>
    </select>
  </div>
</template>

<script>
import { changeAge } from "../store/actions-types";
import { PERSON_CHANGE_ADDRESS } from "../store/mutation-types";
export default {
  name: "Person",
  data() {
    return {
      years: "",
      addre: "武汉",
    };
  },
  computed: {
    name() {
      // 开启命名空间后,读取state时的原始写法:this.$store.state.模块名.属性名
      return this.$store.state.personAbout.name;
    },
    age() {
      return this.$store.state.personAbout.age;
    },
    address() {
      return this.$store.state.personAbout.address;
    },
    sum() {
      return this.$store.state.countAbout.sum;
    },
    bigSum() {
      // 开启命名空间后,读取getters时的原始写法:this.$store.getters["模块名/属性名"]
      return this.$store.getters["countAbout/bigSum"];
    },
  },
  methods: {
    changeAge() {
      // 开启命名空间后,使用dispatch时的原始写法:this.$store.dispatch("模块名/方法名", xxx),xxx是方法的入参
      this.$store.dispatch(`personAbout/${changeAge}`, this.years);
    },
    changeAddress() {
      // 开启命名空间后,使用commit时的原始写法:this.$store.commit("模块名/方法名", xxx),xxx是方法的入参
      this.$store.commit(`personAbout/${PERSON_CHANGE_ADDRESS}`, this.addre);
    },
  },
};
</script>
2
3
4
5
6
7
8
9
10
11
12
13
14
15
16
17
18
19
20
21
22
23
24
25
26
27
28
29
30
31
32
33
34
35
36
37
38
39
40
41
42
43
44
45
46
47
48
49
50
51
52
53
54
55
56
57
58
59
60
61
62
63
64
Count.vue:
<template>
  <div>
    <h2>Person组件里的姓名是:{{ name }},年龄是:{{ age }},住址是:{{ address }}</h2>
    <h2>下面是Count组件本身的内容:</h2>
    <h2>当前和为:{{ sum }}</h2>
    <h2>当前和放大十倍后:{{ bigSum }}</h2>
    <select v-model.number="num">
      <option value="1">1</option>
      <option value="2">2</option>
      <option value="3">3</option>
    </select>
    <!-- 因为使用mapMutations和mapActions,在模板中必须手动传参 -->
    <button @click="increment(num)">加{{ num }}</button>
    <button @click="decrement(num)">减{{ num }}</button>
    <button @click="incrementOdd(num)">当前和为奇数时再加{{ num }}</button>
    <button @click="incrementWait(num)">等一等再加{{ num }}</button>
  </div>
</template>

<script>
import { mapActions, mapMutations, mapState, mapGetters } from "vuex";
import { addWait, addOdd } from "../store/actions-types";
import { COUNT_ADD, COUNT_SUBTRACT } from "../store/mutation-types";
export default {
  name: "Count",
  data() {
    return { num: 1 };
  },
  computed: {
    // 开启命名空间后,读取state时的mapState写法:...mapState("模块名", ["属性名"])
    ...mapState("countAbout", ["sum"]),
    ...mapState("personAbout", ["name", "age", "address"]),
    // 开启命名空间后,读取getters时的mapGetters写法:...mapGetters("模块名", ["属性名"])
    ...mapGetters("countAbout", ["bigSum"]),
  },
  methods: {
    // 开启命名空间后,使用dispatch时的mapActions写法:...mapActions("模块名", ["方法名"])
    //  或者 ...mapActions("模块名", { "本组件里的方法名": "store里的方法名" })
    ...mapActions("countAbout", {
      incrementOdd: addOdd,
      incrementWait: addWait,
    }),
    // 开启命名空间后,使用commit时的mapMutations写法:...mapMutations("模块名", ["方法名"])
    //  或者 ...mapMutations("模块名", { "本组件里的方法名": "store里的方法名" })
    ...mapMutations("countAbout", {
      increment: COUNT_ADD,
      decrement: COUNT_SUBTRACT,
    }),
  },
};
</script>

<style>
button {
  margin-left: 5px;
}
</style>
2
3
4
5
6
7
8
9
10
11
12
13
14
15
16
17
18
19
20
21
22
23
24
25
26
27
28
29
30
31
32
33
34
35
36
37
38
39
40
41
42
43
44
45
46
47
48
49
50
51
52
53
54
55
56
57
总结拓展:
Vuex 的模块化+命名空间:让代码更好维护,让多种数据分类更加明确。
修改
store.js(store/index.js):const countAbout = { // 开启命名空间 namespaced: true, state: { ... }, actions: { ... }, mutations: { ... }, } const personAbout = { // 开启命名空间 namespaced: true, state: { ... }, actions: { ... }, mutations: { ... }, } const store = new Vuex.Store({ modules: { countAbout, personAbout } })1
2
3
4
5
6
7
8
9
10
11
12
13
14
15
16
17
18
19
20开启命名空间后,组件中读取 state 数据:
// 方式一:原始写法,this.$store.state.模块名.属性名
this.$store.state.personAbout.name;
// 方式二:借助mapState的写法,...mapState("模块名", ["属性名"])
...mapState("countAbout", ["sum"]),
1
2
3
4开启命名空间后,组件中读取 getters 数据:
// 方式一:原始写法,this.$store.getters["模块名/方法名"]
this.$store.getters["personAbout/bigSum"]; // bigSum是属性的形式,实际上是个方法
// 方式二:借助mapGetters的写法,...mapGetters("模块名", ["方法名"])
...mapState("countAbout", ["bigSum"]),
1
2
3
4开启命名空间后,组件中调用 dispatch:
// 方式一:原始写法,this.$store.dispatch("模块名/方法名", xxx),xxx是方法的入参
this.$store.dispatch(`personAbout/${changeAge}`, this.years); // years是入参
// 方式二:借助mapActions的写法,...mapActions("模块名", ["方法名"])
//  或者 ...mapActions("模块名", { "本组件里的方法名": "store里的方法名" })
...mapActions("countAbout", {
  incrementOdd: addOdd,  // 这里没有入参,需要在模板使用处手动添加入参
  incrementWait: addWait,
}),
1
2
3
4
5
6
7
8开启命名空间后,组件中调用 commit:
// 方式一:原始写法,this.$store.commit("模块名/方法名", xxx),xxx是方法的入参
this.$store.commit(`personAbout/${PERSON_CHANGE_ADDRESS}`, this.addre); // addre是入参
// 方式二:借助mapMutations的写法,...mapMutations("模块名", ["方法名"])
//  或者 ...mapMutations("模块名", { "本组件里的方法名": "store里的方法名" })
...mapMutations("countAbout", {
  increment: COUNT_ADD,  // 这里没有入参,需要在模板使用处手动添加入参
  decrement: COUNT_SUBTRACT,
}),
1
2
3
4
5
6
7
8
# 三、Vue Router
路由:从起点到终点这样一个端到端的形式(关系),类似于映射或者key-value。
路由器:管理着多个路由,决定着路由具体是哪个端口到哪个端口,以及如何解析端口等。
单页面应用:也叫 SPA,它表示应用始终只使用一个 html 页面进行展示以及与用户的交互,不会重新加载页面也不会跳转到新页面,如果页面需要新数据可以通过 ajax 技术从服务端获取。即使用户点击了应用中属于应用本身的链接,也只是浏览器里URL 路径变化了,而页面只是局部进行了重新渲染。SPA 的好处就是用户无需频繁切换浏览器页签,方便前端开发人员管理页面以及复杂组件的更新。坏处就是代码等资源比较集中那么初始化加载慢,因为内容都随用随取所以 SEO 较差。
web 路由器:前端项目中的路由器,用于决定什么 URL(端)展示什么模块(组件)。服务器端里的路由器,接收客户端的请求,根据它的请求使用对应的方法(接口)来处理这一次请求。
# 3.1 搭建 Vue Router 环境
Vue Router是 Vue 官方提供的路由管理器,和 Vuex 一样也是一个插件。它会配置路由信息,决定 URL 地址展示什么页面,可实现不重新加载整个页面就能局部更新渲染组件(改变内容无需刷新页面)。
先使用npm i vue-router在项目中局部安装 Vue Router,然后在项目根目录下新建router目录,并在该目录下新建index.js文件。用于存放router 路由器的相关代码,也是用于集中管理路由。
导入Vue和Vue Router,使用使用Vue.use(Router)将Vue Router功能增加到 Vue 上。然后对Router进行实例化,传入一个配置对象,该配置对象有一个routers配置,是用来定义路由规则,也就是决定哪个 url 会对应到哪个组件(端到端的关系)。
import Vue from "vue";
import Router from "vue-router";

// 这个同Vuex,在实例化之前就将Router的功能增加到Vue上
Vue.use(Router);

// 对Router进行实例化,并设置路由规则,URL对应着组件
export default new Router({
  // 是routes不是routers
  routes: [
    {
      path: "/xxx", // 地址
      component: Xxx, // 组件
    },
  ],
});
2
3
4
5
6
7
8
9
10
11
12
13
14
15
16
将导出的 Router 实例放在 Vue 配置对象的名为router属性上,是为了让每个组件都能使用 router。main.js代码如下:
import Vue from "vue";
import App from "./App.vue";
import router from "./router/index";

new Vue({
  el: "#app",
  render: (h) => h(App),
  // 在这里放入Router实例,那么每个组件里都能使用`this.$router`访问了
  router,
  components: { App },
});
2
3
4
5
6
7
8
9
10
11
# 3.2 Router 的基本使用
我们先在项目的public目录下准备两个 html,用于展示多页面项目。将下面两个 html 放入public目录后,打开http://localhost:8080/home.html (opens new window),会看到Home和About切换按钮以及它们的展示区域,点击它们就可以看到浏览器 URL 变了并且页面重新加载了。
<html lang="en">
  <head>
    <meta charset="utf-8" />
    <title>Vue App</title>
    <style>
      a {
        text-decoration: none;
      }
      .link {
        float: left;
        width: 6%;
        margin-left: 10%;
      }
      .content {
        float: left;
        width: 50%;
        height: 86px;
        margin-left: 2%;
        background-color: gray;
      }
      .list-item {
        position: relative;
        display: block;
        padding: 10px 15px;
        background-color: #fff;
        border: 1px solid #ddd;
      }
      .list-item.active {
        z-index: 2;
        color: #fff;
        background-color: #337ab7;
        border-color: #337ab7;
      }
    </style>
  </head>
  <body>
    <div>
      <div class="link">
        <a class="list-item active" href="./home.html">Home</a>
        <a class="list-item" href="./about.html">About</a>
      </div>
      <div class="content">
        <p>我是Home的内容,我是Home的内容,我是Home的内容,我是Home的内容</p>
      </div>
    </div>
  </body>
</html>
2
3
4
5
6
7
8
9
10
11
12
13
14
15
16
17
18
19
20
21
22
23
24
25
26
27
28
29
30
31
32
33
34
35
36
37
38
39
40
41
42
43
44
45
46
47
<html lang="en">
  <head>
    <meta charset="utf-8" />
    <title>Vue App</title>
    <style>
      a {
        text-decoration: none;
      }
      .link {
        float: left;
        width: 6%;
        margin-left: 10%;
      }
      .content {
        float: left;
        width: 50%;
        height: 86px;
        margin-left: 2%;
        background-color: gray;
      }
      .list-item {
        position: relative;
        display: block;
        padding: 10px 15px;
        background-color: #fff;
        border: 1px solid #ddd;
      }
      .list-item.active {
        z-index: 2;
        color: #fff;
        background-color: #337ab7;
        border-color: #337ab7;
      }
    </style>
  </head>
  <body>
    <div>
      <div class="link">
        <a class="list-item" href="./home.html">Home</a>
        <a class="list-item active" href="./about.html">About</a>
      </div>
      <div class="content">
        <p>我是About的内容,我是About的内容,我是About的内容,我是About的内容</p>
      </div>
    </div>
  </body>
</html>
2
3
4
5
6
7
8
9
10
11
12
13
14
15
16
17
18
19
20
21
22
23
24
25
26
27
28
29
30
31
32
33
34
35
36
37
38
39
40
41
42
43
44
45
46
47
我们要使用Vue + Vue Router实现同样的功能。在项目的src里新建pages目录,在该目录下新建Home.ve和About.vue。然后将主要代码放入App.vue里,重点来了,把 Home\About 这两个<a>标签换成router-link来替代点击修改 URL 的功能,再将展示区的<p>标签换成<router-view>>来替代展示功能,当 URL 变化时不会重新加载页面,只会让展示区重新渲染。最后打开http://localhost:8080/home (opens new window)进行验证。代码如下:
router/index.js:
import Vue from "vue";
import Router from "vue-router";
import Home from "../pages/Home";
import About from "../pages/About";

Vue.use(Router);

export default new Router({
  // 将Home和About加到路由里,并设置让它们展示的URL地址
  routes: [
    {
      path: "/home", // URL地址 端
      component: Home, // 展示组件 端
    },
    {
      path: "/about",
      component: About,
    },
  ],
});
2
3
4
5
6
7
8
9
10
11
12
13
14
15
16
17
18
19
20
App.vue:
<template>
  <div class="outer">
    <div class="link">
      <!-- <a class="list-item" href="./home.html">Home</a>
        <a class="list-item active" href="./about.html">About</a> -->
      <!-- 使用router-link来替代之前的a标签,to对应着href,active-class对应着active -->
      <router-link to="/home" active-class class="list-item">Home</router-link>
      <router-link to="/about" class="list-item">About</router-link>
    </div>
    <div class="content">
      <!-- <p>我是About的内容,我是About的内容,我是About的内容,我是About的内容</p> -->
      <!-- 使用router-view来替代之前的p,其实就是组件展示(端到端,这是展示端) -->
      <router-view></router-view>
    </div>
  </div>
</template>

<script>
export default {
  name: "App",
};
</script>
<style>
.outer {
  display: flex;
}
.link {
  display: flex;
  flex-direction: column;
  margin-left: 16%;
}
.content {
  margin-left: 10px;
  padding: 20px;
  background-color: darkgrey;
}
.list-item {
  margin-bottom: 10px;
  padding: 10px 15px;
  background-color: #fff;
  border: 1px solid #ddd;
}
.list-item.active,
.list-item.router-link-exact-active {
  z-index: 2;
  color: #fff;
  background-color: #337ab7;
  border-color: #337ab7;
}
a {
  text-decoration: none;
}
</style>
2
3
4
5
6
7
8
9
10
11
12
13
14
15
16
17
18
19
20
21
22
23
24
25
26
27
28
29
30
31
32
33
34
35
36
37
38
39
40
41
42
43
44
45
46
47
48
49
50
51
52
53
pages/Home.vue:
<template>
  <p>Vue组件Home:我是Home的内容,我是Home的内容,我是Home的内容,我是Home的内容</p>
</template>

<script>
export default {
  name: "Home",
};
</script>
2
3
4
5
6
7
8
9
pages/About.vue:
<template>
  <p>Vue组件About:我是About的内容,我是About的内容,我是About的内容,我是About的内容</p>
</template>

<script>
export default {
  name: "About",
};
</script>
2
3
4
5
6
7
8
9
有两个注意点:
路由进行切换的时候,上一个组件默认会被销毁(可以手动设置不被销毁),新的组件会生成并渲染到页面中。
路由组件的实例上有
$route和$router,其中$route是当前组件的对应的路由规则信息,$router就是项目中唯一的一个路由器(与 Vuex 一样,唯一的一个$store)。
# 3.3 嵌套路由和 query 传参
嵌套路由也叫多级路由,在一个路由组件中还有一层路由,一般最多套五层。
只需要把router/index.js里的某级路由里添加一个children属性,这个children里就是当前路由的子级路由,仍然要给它配置path和component。要注意的是子级路由的path,不要带上/,也不要写上完整路径(不要path: "/父级/子级",也不要path: "/子级"),因为 Vue Router 会自动帮你补齐,最终的写法只需要path: "子级"这种形式即可。
routes: [
  {
    path: "/home", // 一级路由
    component: Home,
    children: [
      {
        // 二级路由
        path: "news", // 不要带上`/`,也不要写'/home/news'
        component: News,
      },
      {
        path: "message", // 不要带上`/`,也不要写'/home/message'
        component: Message,
      },
    ],
  },
  {
    path: "/about", // 一级路由
    component: About,
  },
];
2
3
4
5
6
7
8
9
10
11
12
13
14
15
16
17
18
19
20
21
然后在那个对应路由组件内部使用<router-link>和<router-view>。特别注意,to属性要写上完整的路径,这个 Vue Router 帮你补不齐,所以最终写法是to="/父级/子级"。
<!-- to写上完整路径 -->
<router-link active-class to="/home/news" class="list-item">News</router-link>
2
相关完整代码如下:
router/index.js:
import Vue from "vue";
import Router from "vue-router";
import Home from "../pages/Home";
import About from "../pages/About";
import News from "../pages/News";
import Message from "../pages/Message";

Vue.use(Router);

export default new Router({
  routes: [
    {
      path: "/home", // URL 端
      component: Home, // 展示 端
      children: [
        {
          // 子级路由(当前是二级路由)
          path: "news", // 不要带上`/`
          component: News,
        },
        {
          path: "message",
          component: Message,
        },
      ],
    },
    {
      path: "/about",
      component: About,
    },
  ],
});
2
3
4
5
6
7
8
9
10
11
12
13
14
15
16
17
18
19
20
21
22
23
24
25
26
27
28
29
30
31
32
Home.vue:
<template>
  <div>
    <p>Vue组件Home:我是Home的内容,我是Home的内容,我是Home的内容,我是Home的内容</p>
    <div>
      <ul class="nav">
        <li>
          <!-- <a class="list-group-item active" href="./home-news.html">News</a> -->
          <!-- 这里唯一要注意的是to里的路径一定要写完整 -->
          <router-link active-class to="/home/news" class="list-item">News</router-link>
        </li>
        <li>
          <!-- <a class="list-group-item" href="./home-message.html">Message</a> -->
          <!-- 这里唯一要注意的是to里的路径一定要写完整 -->
          <router-link to="/home/message" class="list-item">Message</router-link>
        </li>
      </ul>
      <div class="content-child">
        <!-- 展示端 -->
        <router-view></router-view>
      </div>
    </div>
  </div>
</template>

<script>
export default {
  name: "Home",
};
</script>

<style>
.nav {
  display: flex;
  justify-content: flex-start;
  padding-left: 0;
  margin-top: 35px;
  list-style: none;
}
.nav > li {
  width: 100px;
}
.content-child {
  background-color: darkgray;
}
</style>
2
3
4
5
6
7
8
9
10
11
12
13
14
15
16
17
18
19
20
21
22
23
24
25
26
27
28
29
30
31
32
33
34
35
36
37
38
39
40
41
42
43
44
45
News.vue:
<template>
  <ul>
    <li>news001</li>
    <li>news002</li>
    <li>news003</li>
  </ul>
</template>

<script>
export default {
  name: "News",
};
</script>
2
3
4
5
6
7
8
9
10
11
12
13
Message.vue:
<template>
<div>
<ul>
<li><a href="http://localhost:8080/#/home/message">message001</a> </li>
<li><a href="http://localhost:8080/#/home/message">message002</a> </li>
<li><a href="http://localhost:8080/#/home/message">message003</a> </li>
</ul>
</div>
</template>
<script>
export default {
name: "Message",
};
</script>
2
3
4
5
6
7
8
9
10
11
12
13
14
15
现在有个需求,点击 Message 组件里的每条信息,在下面展示对应的id和tittle。可以给 Message 的每条信息弄个路由跳转<router-link>,只不过路由展示只需要一个组件,我们在路由跳转时进行一个query 传参即可,然后在这个新组件展示时使用this.$route.query进行接收参数。
具体是在<router-link>的 to 属性里的路由链接后追加?xxx=yyy&www=zzz这种传参,另一种比较方便的写法是,使用 to 的对象形式:
// 写法一
:to="`/home/message/detail?id=${item.id}&title=${item.title}`"
// 写法二
:to="{
  path: '/home/message/detail', // 路由地址
  query: {                      // query传参,它是个对象,里面一组组key-value
    id: item.id,
    title: item.title,
  },
}"
2
3
4
5
6
7
8
9
10
需求实现代码如下:
router/index.js:
import Vue from "vue";
import Router from "vue-router";
import Home from "../pages/Home";
import About from "../pages/About";
import News from "../pages/News";
import Message from "../pages/Message";
import Detail from "../pages/Detail";

Vue.use(Router);

export default new Router({
  routes: [
    {
      path: "/home", // URL 端
      component: Home, // 展示 端
      children: [
        {
          // 子级路由(当前是二级路由)
          path: "news", // 不要带上`/`
          component: News,
        },
        {
          path: "message",
          component: Message,
          children: [
            {
              // 点击每条message信息时在下方展示详情
              path: "detail", // 子级路由(当前是三级路由)
              component: Detail,
            },
          ],
        },
      ],
    },
    {
      path: "/about",
      component: About,
    },
  ],
});
2
3
4
5
6
7
8
9
10
11
12
13
14
15
16
17
18
19
20
21
22
23
24
25
26
27
28
29
30
31
32
33
34
35
36
37
38
39
40
Message.vue:
<template>
  <div>
    <ul>
      <li v-for="(item, index) in list" :key="index">
        <!-- 写法一:直接在链接后加上传统的`?xxx=yyy&www=zzz`即可 -->
        <!-- <router-link
          :to="`/home/message/detail?id=${item.id}&title=${item.title}`"
        >{{item.title}}</router-link> -->
        <!-- 写法二:使用to的对象形式,对象的path就是路由路径,query是个对象,用于存储路径后面的值 -->
        <router-link
          :to="{
            path: '/home/message/detail',
            query: {
              id: item.id,
              title: item.title,
            },
          }"
          >{{ item.title }}</router-link
        >
      </li>
    </ul>
    <div>
      <router-view></router-view>
    </div>
  </div>
</template>

<script>
export default {
  name: "Message",
  data() {
    return {
      list: [
        { id: "001", title: "message001" },
        { id: "002", title: "message002" },
        { id: "003", title: "message003" },
      ],
    };
  },
};
</script>
2
3
4
5
6
7
8
9
10
11
12
13
14
15
16
17
18
19
20
21
22
23
24
25
26
27
28
29
30
31
32
33
34
35
36
37
38
39
40
41
Detail.vue:
<template>
  <div>
    <!-- 使用this.$route.query接收路由跳转时的query传参 -->
    <h2>id:{{ $route.query.id }}</h2>
    <h2>title:{{ $route.query.title }}</h2>
  </div>
</template>

<script>
export default {
  name: "Detail",
};
</script>
2
3
4
5
6
7
8
9
10
11
12
13
# 3.4 命名路由和 params 传参
我们回顾上一节 to 属性的对象写法:
// to属性的对象写法
:to="{
  path: '/home/message/detail', // 路由地址
  query: {                      // query传参,它是个对象,里面一组组key-value
    id: item.id,
    title: item.title,
  },
}"
2
3
4
5
6
7
8
我们可以使用命名路由来简化层级比较深的路由。其实就是给路由配置规则的时候加上name: xxx,对应在<router-link>的 to 属性对象形式里可使用name,无需再写一大串的path。
// to属性的对象写法
:to="{
  // 使用name的方式简化path的方式
  name: 'xiangqing',
  // path: '/home/message/detail',
  query: {
    id: item.id,
    title: item.title,
  },
}"
2
3
4
5
6
7
8
9
10
简化后的相关完整代码如下:
router/index.js:
import Vue from "vue";
import Router from "vue-router";
import Home from "../pages/Home";
import About from "../pages/About";
import News from "../pages/News";
import Message from "../pages/Message";
import Detail from "../pages/Detail";

Vue.use(Router);

export default new Router({
  routes: [
    {
      path: "/home",
      component: Home,
      children: [
        {
          path: "news",
          component: News,
        },
        {
          path: "message",
          component: Message,
          children: [
            {
              name: "xiangqing", // 给比较深路由添加name,在<router-link>里的to就会更方便
              path: "detail",
              component: Detail,
            },
          ],
        },
      ],
    },
    {
      path: "/about",
      component: About,
    },
  ],
});
2
3
4
5
6
7
8
9
10
11
12
13
14
15
16
17
18
19
20
21
22
23
24
25
26
27
28
29
30
31
32
33
34
35
36
37
38
39
Message.vue:
<template>
  <div>
    <ul>
      <li v-for="(item, index) in list" :key="index">
        <router-link
          :to="{
            // 使用name的方式简化path的方式
            name: 'xiangqing',
            // path: '/home/message/detail',
            query: {
              id: item.id,
              title: item.title,
            },
          }"
          >{{ item.title }}</router-link
        >
      </li>
    </ul>
    <div>
      <router-view></router-view>
    </div>
  </div>
</template>

<script>
export default {
  name: "Message",
  data() {
    return {
      list: [
        { id: "001", title: "message001" },
        { id: "002", title: "message002" },
        { id: "003", title: "message003" },
      ],
    };
  },
};
</script>
2
3
4
5
6
7
8
9
10
11
12
13
14
15
16
17
18
19
20
21
22
23
24
25
26
27
28
29
30
31
32
33
34
35
36
37
38
params 传参,首先把路由配置中的path路径进行修改,比如原来的是path: 'detail',那现在就需要提前给params 参数进行占位,那就是path: 'detail/:id/:title'。然后在<router-link>的 to 属性里改成如下两种方式(特别注意第二种方式):
// to属性的普通写法
:to="`/home/message/detail/${item.id}/${item.title}`"
// to属性的对象写法,params传参只能搭配name使用,不能搭配path
:to="{
  // 使用name的方式
  name: 'xiangqing',
  // 这里是params传参,那此时to对象里不能使用path,得用name
  params: {
    id: item.id,
    title: item.title,
  },
}"
2
3
4
5
6
7
8
9
10
11
12
相关完整代码如下:
router/index.js:
import Vue from "vue";
import Router from "vue-router";
import Home from "../pages/Home";
import About from "../pages/About";
import News from "../pages/News";
import Message from "../pages/Message";
import Detail from "../pages/Detail";

Vue.use(Router);

export default new Router({
  routes: [
    {
      path: "/home",
      component: Home,
      children: [
        {
          path: "news",
          component: News,
        },
        {
          path: "message",
          component: Message,
          children: [
            {
              name: "xiangqing",
              path: "detail/:id/:title", // prams传参,提前占位
              component: Detail,
            },
          ],
        },
      ],
    },
    {
      path: "/about",
      component: About,
    },
  ],
});
2
3
4
5
6
7
8
9
10
11
12
13
14
15
16
17
18
19
20
21
22
23
24
25
26
27
28
29
30
31
32
33
34
35
36
37
38
39
Message.vue:
<template>
  <div>
    <ul>
      <li v-for="(item, index) in list" :key="index">
        <!-- 方式一 -->
        <!-- <router-link :to="`/home/message/detail/${item.id}/${item.title}`">{{
          item.title
        }}</router-link> -->
        <!-- 方式二,特别注意params传参不能和path搭配使用,得使用name -->
        <router-link
          :to="{
            // 使用name的方式
            name: 'xiangqing',
            // 这里是params传参,那此时to对象里不能使用path,得用name
            params: {
              id: item.id,
              title: item.title,
            },
          }"
          >{{ item.title }}</router-link
        >
      </li>
    </ul>
    <div>
      <router-view></router-view>
    </div>
  </div>
</template>

<script>
export default {
  name: "Message",
  data() {
    return {
      list: [
        { id: "001", title: "message001" },
        { id: "002", title: "message002" },
        { id: "003", title: "message003" },
      ],
    };
  },
};
</script>
2
3
4
5
6
7
8
9
10
11
12
13
14
15
16
17
18
19
20
21
22
23
24
25
26
27
28
29
30
31
32
33
34
35
36
37
38
39
40
41
42
43
Detail.vue:
<template>
  <div>
    <!-- 使用this.$route.params接收路由跳转时的params传参 -->
    <h2>id:{{ $route.params.id }}</h2>
    <h2>title:{{ $route.params.title }}</h2>
  </div>
</template>

<script>
export default {
  name: "Detail",
};
</script>
2
3
4
5
6
7
8
9
10
11
12
13
# 3.5 路由的 props 传参
我们可以看到 Detail 组件在使用接收到的参数时,会使用$route.params.id这样一长串的代码。使用计算属性可以简化它,但是我们这节要使用路由的 props 传参的方式来简化。
在配置路由信息时,在path、component平级处加上props这个新配置,这个新配置的值有三种形式,对象、布尔值和函数。
路由的 props 传参有三种形式:
{
  path: 'message',
  component: Message,
  children: [{
      name: 'xiangqing',
      path: 'detail/:id/:title', // prams传参,提前占位
      component: Detail,
      // 第一种,是个对象,该对象中所有key-value的组合最终都会通过props传给Detail组件
      // props: {a: 900, b: 1000},
      // 第二种,是个布尔值,布尔值为true时,把路由接收到的所有params参数通过props传给Detail组件
      // props: true,
      // 第三种,是个函数,函数返回的对象中所有key-value的组合最终都会通过props传给Detail组件
      // 函数的形参是route,它是当前路由信息,保存着params和query传参数据
      props(route) {
        return {id: route.query.id, title: route.query.title}
      }
  }]
}
2
3
4
5
6
7
8
9
10
11
12
13
14
15
16
17
18
我们就使路由的 props 传参第三种形式来优化前面的例子:
router/index.js:
import Vue from "vue";
import Router from "vue-router";
import Home from "../pages/Home";
import About from "../pages/About";
import News from "../pages/News";
import Message from "../pages/Message";
import Detail from "../pages/Detail";

Vue.use(Router);

export default new Router({
  routes: [
    {
      path: "/home",
      component: Home,
      children: [
        {
          path: "news",
          component: News,
        },
        {
          path: "message",
          component: Message,
          children: [
            {
              name: "xiangqing",
              path: "detail",
              component: Detail,
              // 使用路由props的函数形式,形参是route路由信息,返回值的key-value会作为Detail的props
              props({ query }) {
                return { id: query.id, title: query.title };
              },
            },
          ],
        },
      ],
    },
    {
      path: "/about",
      component: About,
    },
  ],
});
2
3
4
5
6
7
8
9
10
11
12
13
14
15
16
17
18
19
20
21
22
23
24
25
26
27
28
29
30
31
32
33
34
35
36
37
38
39
40
41
42
43
Message.vue:
<template>
  <div>
    <ul>
      <li v-for="(item, index) in list" :key="index">
        <router-link
          :to="{
            name: 'xiangqing',
            query: {
              id: item.id,
              title: item.title,
            },
          }"
          >{{ item.title }}</router-link
        >
      </li>
    </ul>
    <div>
      <router-view></router-view>
    </div>
  </div>
</template>

<script>
export default {
  name: "Message",
  data() {
    return {
      list: [
        { id: "001", title: "message001" },
        { id: "002", title: "message002" },
        { id: "003", title: "message003" },
      ],
    };
  },
};
</script>
2
3
4
5
6
7
8
9
10
11
12
13
14
15
16
17
18
19
20
21
22
23
24
25
26
27
28
29
30
31
32
33
34
35
36
Detail.vue:
<template>
  <div>
    <!-- 直接使用props参数 -->
    <h2>id:{{ id }}</h2>
    <h2>title:{{ title }}</h2>
  </div>
</template>

<script>
export default {
  name: "Detail",
  // 接收路由props传参
  props: ["id", "title"],
};
</script>

<style></style>
2
3
4
5
6
7
8
9
10
11
12
13
14
15
16
17
# 3.6 编程式的导航
在开始学习编程式的导航之前我们看一下浏览器左上角的“前进”和“后退”。这两个按钮依赖一个历史页面存储结构,该结构其实是一个栈数据类型来。在点击“后退”时,会让“指针”挪动到后面一条 URL 相关的页面;在点击“前进”时,会让“指针”挪动到前面一条 URL 相关的页面。
在页面点击新链接,浏览器地址栏的 URL 更新,这个新的 URL 会被压到栈里(push 方式)。<router-link>就是默认使用这种方式(push 方式),它其实还有一个replace 方式,在点击新链接,浏览器地址栏的 URL 更新,但会将栈顶当前这条 URL替换成新的 URL(以前是追加,现在是替换最顶上那条)。
<!-- 比如我们访问的顺序是:# - about - home - news - message - detail,目前在Detail这里,
由于下面这行代码,导致后退的顺序是detail - message - home - about - # -->
<router-link to="/home/message" replace></router-link>
2
3
我们再来说说编程式的导航,它的作用是不借助<router-link>来实现路由跳转,让路由跳转更加灵活。
那它借助的是什么呢?是$router里的各种方法(方法具体在原型上),比如push手动跳转到目标路由(类似<router-link>的 to 属性),back往后退一步路由(类似浏览器“后退”),forward往前进一步路由(类似浏览器“前进”),go(value)当 value 为正数时前进几步路由为负数时后退几步路由。
首先我们在 Message 组件中,实现点击每条 message 尾后的<button>就跳转路由。具体要在点击事件回调函数里使用this.$router.push(param),如果效果要与之前的<router-link>效果一样,那这个param必须与<router-link>的to 属性值一样并且是对象形式。
其实还有this.$router.replace(param),使用新页面信息替换当前页面信息。这里额外说一下,<router-link to="xxx">其实内部是调用了push方法的,只是它是标签的使用形式,push是 js 编程的使用形式。
<template>
  <div>
    <ul>
      <li v-for="(item, index) in list" :key="index">
        {{ item.title }}
        <!-- 我们将router-link换成了button来跳转路由 -->
        <button @click="showDetailPush(item)">查看详情(push方式)</button>
        <button @click="showDetailReplace(item)">查看详情(replace方式)</button>
      </li>
    </ul>
    <div>
      <router-view></router-view>
    </div>
  </div>
</template>

<script>
export default {
  name: "Message",
  data() {
    return {
      list: [
        { id: "001", title: "message001" },
        { id: "002", title: "message002" },
        { id: "003", title: "message003" },
      ],
    };
  },
  methods: {
    showDetailPush(item) {
      // 手动跳转就需要使用之前to的对象形式
      // push,追加新的页面信息
      this.$router.push({
        name: "xiangqing",
        query: {
          id: item.id,
          title: item.title,
        },
      });
    },
    showDetailReplace(item) {
      // 手动跳转就需要使用之前to的对象形式
      // replace,将原来的当前页面信息替换成这里的新页面信息
      this.$router.replace({
        name: "xiangqing",
        query: {
          id: item.id,
          title: item.title,
        },
      });
    },
  },
};
</script>
2
3
4
5
6
7
8
9
10
11
12
13
14
15
16
17
18
19
20
21
22
23
24
25
26
27
28
29
30
31
32
33
34
35
36
37
38
39
40
41
42
43
44
45
46
47
48
49
50
51
52
53
54
我们使用back、forward和go(value)来实现前进和后退路由:
App.vue:
<template>
  <div>
    <div>
      <button class="backStep" @click="go(-2)">后退2步</button>
      <button class="back" @click="back">后退</button>
      <button class="forward" @click="forward">前进</button>
      <button class="forwardStep" @click="go(2)">前进2步</button>
    </div>
    <div class="outer">
      <div class="link">
        <router-link to="/home" active-class class="list-item">Home</router-link>
        <router-link to="/about" class="list-item">About</router-link>
      </div>
      <div class="content">
        <router-view></router-view>
      </div>
    </div>
  </div>
</template>
<script>
export default {
  name: "App",
  methods: {
    back() {
      this.$router.back();
    },
    forward() {
      this.$router.forward();
    },
    go(value) {
      this.$router.go(value);
    },
  },
};
</script>
<style>
.back,
.forward {
  width: 60px;
  margin: 10px 10px 20px 10px;
}
.backStep {
  margin-left: 16%;
}
.outer {
  display: flex;
}
.link {
  display: flex;
  flex-direction: column;
  margin-left: 16%;
}
.content {
  margin-left: 10px;
  padding: 20px;
  background-color: darkgrey;
}
.list-item {
  margin-bottom: 10px;
  padding: 10px 15px;
  background-color: #fff;
  border: 1px solid #ddd;
}
.list-item.active,
.list-item.router-link-exact-active {
  z-index: 2;
  color: #fff;
  background-color: #337ab7;
  border-color: #337ab7;
}
a {
  text-decoration: none;
}
</style>
2
3
4
5
6
7
8
9
10
11
12
13
14
15
16
17
18
19
20
21
22
23
24
25
26
27
28
29
30
31
32
33
34
35
36
37
38
39
40
41
42
43
44
45
46
47
48
49
50
51
52
53
54
55
56
57
58
59
60
61
62
63
64
65
66
67
68
69
70
71
72
73
74
# 3.7 缓存路由组件
我们经常需要在切换页签跳转路由时,能缓存输入组件内的信息,但跳转路由默认是将之前的组件销毁 destroy 了。要解决这个问题,需要使用<keep-alive>标签将<router-view>进行包裹。
使用<keep-alive>标签包裹之后,这个<router-view>相关的所有组件都将会被缓存,如果只想缓存个别的,就添加include="News"属性。特别注意,News这个名字是组件内部配置对象里的name属性值。include还可以使用v-bind动态绑定,绑定一个数组['News', 'Message'],让这两个组件被缓存而不被销毁。
Home.vue:
<template>
  <div>
    <p>Vue组件Home:我是Home的内容,我是Home的内容,我是Home的内容,我是Home的内容</p>
    <div>
      <ul class="nav">
        <li>
          <router-link active-class to="/home/news" class="list-item">News</router-link>
        </li>
        <li>
          <router-link to="/home/message" class="list-item">Message</router-link>
        </li>
      </ul>
      <!-- 使用keep-alive标签包裹router-view,让相关组件被缓存,如果设置include,
      那就只让include里的组件被缓存。include可以是数组,使用v-bind进行动态绑定,让数组里对应的组件进行缓存 -->
      <keep-alive include="News" class="content-child">
        <router-view></router-view>
      </keep-alive>
    </div>
  </div>
</template>
<script>
export default { name: "Home" };
</script>

<style>
.nav {
  display: flex;
  justify-content: flex-start;
  padding-left: 0;
  margin-top: 35px;
  list-style: none;
}
.nav > li {
  width: 100px;
}
.content-child {
  background-color: darkgray;
}
</style>
2
3
4
5
6
7
8
9
10
11
12
13
14
15
16
17
18
19
20
21
22
23
24
25
26
27
28
29
30
31
32
33
34
35
36
37
38
39
News.vue:
<template>
  <ul>
    <!-- 增加输入组件 -->
    <li>news001<input /></li>
    <li>news002<input /></li>
    <li>news003<input /></li>
  </ul>
</template>

<script>
export default {
  name: "News", // 这个属性值会被<keep-alive include="News">使用
  // 可以在Message组件里也加上这个日志,如果使用<keep-alive include="News">,
  // 那就只会出现"Message即将被销毁"的日志
  beforeDestroy() {
    console.log("News即将被销毁");
  },
};
</script>
2
3
4
5
6
7
8
9
10
11
12
13
14
15
16
17
18
19
# 3.8 两个新的生命钩子
如果组件被缓存了,也就是使用<keep-alive>标签将<router-view>进行包裹。如果该组件内部持续性的例如定时器,在切换页签时由于该组件没有被销毁,那么就不会走到beforeDestroy里的clearInterval。这样就导致页面性能底,非常耗资源。
News.vue:
<template>
  <div>
    <h1 :style="{ opacity }">我是定时器示例文本</h1>
    <ul>
      <li>news001<input /></li>
      <li>news002<input /></li>
      <li>news003<input /></li>
    </ul>
  </div>
</template>
<script>
export default {
  name: "News",
  data() {
    return {
      opacity: 1,
    };
  },
  mounted() {
    this.timer = setInterval(() => {
      console.log("@");
      this.opacity -= 0.01;
      if (this.opacity <= 0) this.opacity = 1;
    }, 16);
  },
  beforeDestroy() {
    console.log("News即将被销毁");
    clearInterval(this.timer);
  },
};
</script>
2
3
4
5
6
7
8
9
10
11
12
13
14
15
16
17
18
19
20
21
22
23
24
25
26
27
28
29
30
31
解决上面这个问题,就需要两个新的生命钩子activated和deactivated,其中activated是组件激活时被调用(之前切换页签,它被缓存了),deactivated是组件失活时被调用(页签从当前组件切出去了)。注意,这是两个生命钩子是路由组件独有的!
<template>
  <div>
    <h1 :style="{ opacity }">我是定时器示例文本</h1>
    <ul>
      <li>news001<input /></li>
      <li>news002<input /></li>
      <li>news003<input /></li>
    </ul>
  </div>
</template>

<script>
export default {
  name: "News",
  data() {
    return {
      opacity: 1,
    };
  },
  // 组件激活时被调用
  activated() {
    console.log("News被激活");
    this.timer = setInterval(() => {
      console.log("@");
      this.opacity -= 0.01;
      if (this.opacity <= 0) this.opacity = 1;
    }, 16);
  },
  // 组件失活时被调用
  deactivated() {
    console.log("News失活");
    clearInterval(this.timer);
  },
};
</script>
2
3
4
5
6
7
8
9
10
11
12
13
14
15
16
17
18
19
20
21
22
23
24
25
26
27
28
29
30
31
32
33
34
35
# 3.9 路由守卫
路由守卫是在跳转路由的“前后”作出相应的处理(放置守卫)。
基于路由本身来说,分为全局路由守卫和独享路由守卫,它们的区别是,前者是守卫所有路由的切换动作,后者是守卫某个单个路由的切换动作。全局路由守卫还分为前置的和后置的。
# 全局前置路由守卫
全局前置路由守卫,是在所有路由的切换之前作出相应的处理。具体在router.index.js里使用router.beforeEach(func),其中这个func就是在每次切换之前会被调用(其实初始化时也会调用一次)。全局前置路由守卫常用于设置路由的访问权限的。
我们先看一下func的三个形参,func(to, from, next){},to是切换到哪个路由,from是切换前的路由;next就比较重要了,在func内部写上next()就可以“放行”这次的拦截,如果不写就会拦截本次切换。我们设置访问权限就是依靠这三个参数。
import Vue from "vue";
import Router from "vue-router";
import Home from "../pages/Home";
import About from "../pages/About";
import News from "../pages/News";
import Message from "../pages/Message";
import Detail from "../pages/Detail";

Vue.use(Router);

const router = new Router({
  routes: [
    {
      path: "/home",
      component: Home,
      children: [
        {
          name: "xinwen",
          path: "news",
          component: News,
        },
        {
          name: "xinxi",
          path: "message",
          component: Message,
          children: [
            {
              name: "xiangqing",
              path: "detail",
              component: Detail,
              props({ query }) {
                return { id: query.id, title: query.title };
              },
            },
          ],
        },
      ],
    },
    {
      path: "/about",
      component: About,
    },
  ],
});
// 全局前置路由守卫,每次路由切换之前被调用(初始化时也会被调用一次)
router.beforeEach((to, from, next) => {
  if (to.name === "xinxi" || to.name === "xinwen") {
    // 权限
    const jurisdiction = localStorage.getItem("jurisdiction");
    if (jurisdiction && jurisdiction === "pass") {
      next();
    } else {
      alert("您没有访问的权限!");
    }
  } else {
    next();
  }
});
export default router;
2
3
4
5
6
7
8
9
10
11
12
13
14
15
16
17
18
19
20
21
22
23
24
25
26
27
28
29
30
31
32
33
34
35
36
37
38
39
40
41
42
43
44
45
46
47
48
49
50
51
52
53
54
55
56
57
58
59
如果有些路由要做权限设置,而有些又不需要做权限设置,那怎么办呢?我们可以给路由加上一个自定义的标识。route的meta属性是路由元信息,由于存放自定义的东西。
import Vue from "vue";
import Router from "vue-router";
import Home from "../pages/Home";
import About from "../pages/About";
import News from "../pages/News";
import Message from "../pages/Message";
import Detail from "../pages/Detail";

Vue.use(Router);

const router = new Router({
  routes: [
    {
      path: "/home",
      component: Home,
      children: [
        {
          name: "xinwen",
          path: "news",
          component: News,
          // 使用路由元信息meta来存储自定义的标识isAuth
          meta: { isAuth: true },
        },
        {
          name: "xinxi",
          path: "message",
          component: Message,
          // 使用路由元信息meta来存储自定义的标识isAuth
          meta: { isAuth: true },
          children: [
            {
              name: "xiangqing",
              path: "detail",
              component: Detail,
              props({ query }) {
                return { id: query.id, title: query.title };
              },
            },
          ],
        },
      ],
    },
    {
      path: "/about",
      component: About,
    },
  ],
});
// 全局前置路由守卫,每次路由切换之前被调用(初始化时也会被调用一次)
router.beforeEach((to, from, next) => {
  // 换成to.meta.isAuth来判断
  if (to.meta && to.meta.isAuth) {
    // 权限
    const jurisdiction = localStorage.getItem("jurisdiction");
    if (jurisdiction && jurisdiction === "pass") {
      next();
    } else {
      alert("您没有访问的权限!");
    }
  } else {
    next();
  }
});
export default router;
2
3
4
5
6
7
8
9
10
11
12
13
14
15
16
17
18
19
20
21
22
23
24
25
26
27
28
29
30
31
32
33
34
35
36
37
38
39
40
41
42
43
44
45
46
47
48
49
50
51
52
53
54
55
56
57
58
59
60
61
62
63
64
# 全局后置路由守卫
全局后置路由守卫,是在所有路由的切换之后作出相应的处理。具体在router.index.js里使用router.afterEach(func),其中这个func就是在每次切换之后会被调用(其实初始化时也会调用一次)。全局后置路由守卫不是用于设置访问权限的,一般用于切换成功修改页面某个内容的。
import Vue from "vue";
import Router from "vue-router";
import Home from "../pages/Home";
import About from "../pages/About";
import News from "../pages/News";
import Message from "../pages/Message";
import Detail from "../pages/Detail";

Vue.use(Router);

const router = new Router({
  routes: [
    {
      path: "/home",
      component: Home,
      // 使用路由元信息meta
      meta: { title: "主页" },
      children: [
        {
          name: "xinwen",
          path: "news",
          component: News,
          // 使用路由元信息meta
          meta: { isAuth: true, title: "新闻" },
        },
        {
          name: "xinxi",
          path: "message",
          component: Message,
          // 使用路由元信息meta
          meta: { isAuth: true, title: "信息" },
          children: [
            {
              name: "xiangqing",
              path: "detail",
              component: Detail,
              // 使用路由元信息meta
              meta: { title: "详情" },
              props({ query }) {
                return { id: query.id, title: query.title };
              },
            },
          ],
        },
      ],
    },
    {
      path: "/about",
      component: About,
      // 使用路由元信息meta
      meta: { title: "关于" },
    },
  ],
});
// 全局前置路由守卫,每次路由切换之前被调用(初始化时也会被调用一次)
router.beforeEach((to, from, next) => {
  // 换成to.meta.isAuth来判断
  if (to.meta && to.meta.isAuth) {
    // 权限
    const jurisdiction = localStorage.getItem("jurisdiction");
    if (jurisdiction && jurisdiction === "pass") {
      next();
    } else {
      alert("您没有访问的权限!");
    }
  } else {
    next();
  }
});
// 全局后置路由守卫,每次路由切换之后被调用(初始化时也会被调用一次)
router.afterEach((to) => {
  // 每次切换成功后修改页签名
  document.title = to.meta.title || "Vue";
});
export default router;
2
3
4
5
6
7
8
9
10
11
12
13
14
15
16
17
18
19
20
21
22
23
24
25
26
27
28
29
30
31
32
33
34
35
36
37
38
39
40
41
42
43
44
45
46
47
48
49
50
51
52
53
54
55
56
57
58
59
60
61
62
63
64
65
66
67
68
69
70
71
72
73
74
75
# 独享路由守卫
独享路由守卫是守卫某个单个路由的切换动作。独享路由守卫没有前置和后置的,它只有beforeEnter: function(to, from, next),并且就是配置在单个路由信息里,也就是与path和component平级。注意beforeEnter的值就是一个函数,这个函数与全局路由守卫里的func回调函数写法一样,入参也是一样。
import Vue from "vue";
import Router from "vue-router";
import Home from "../pages/Home";
import About from "../pages/About";
import News from "../pages/News";
import Message from "../pages/Message";
import Detail from "../pages/Detail";

Vue.use(Router);

const router = new Router({
  routes: [
    {
      path: "/home",
      component: Home,
      // 使用路由元信息meta
      meta: { title: "主页" },
      children: [
        {
          name: "xinwen",
          path: "news",
          component: News,
          // 使用路由元信息meta
          meta: { title: "新闻" },
          // 独享路由守卫
          beforeEnter: (to, from, next) => {
            const jurisdiction = localStorage.getItem("jurisdiction");
            if (jurisdiction && jurisdiction === "pass") {
              next();
            } else {
              alert("您没有访问的权限!");
            }
          },
        },
        {
          name: "xinxi",
          path: "message",
          component: Message,
          // 使用路由元信息meta
          meta: { title: "信息" },
          children: [
            {
              name: "xiangqing",
              path: "detail",
              component: Detail,
              // 使用路由元信息meta
              meta: { title: "详情" },
              props({ query }) {
                return { id: query.id, title: query.title };
              },
            },
          ],
          // 独享路由守卫
          beforeEnter: (to, from, next) => {
            const jurisdiction = localStorage.getItem("jurisdiction");
            if (jurisdiction && jurisdiction === "pass") {
              next();
            } else {
              alert("您没有访问的权限!");
            }
          },
        },
      ],
    },
    {
      path: "/about",
      component: About,
      // 使用路由元信息meta
      meta: { title: "关于" },
    },
  ],
});
// 全局后置路由守卫,每次路由切换之后被调用(初始化时也会被调用一次)
router.afterEach((to) => {
  // 每次切换成功后修改页签名
  document.title = to.meta.title;
});
export default router;
2
3
4
5
6
7
8
9
10
11
12
13
14
15
16
17
18
19
20
21
22
23
24
25
26
27
28
29
30
31
32
33
34
35
36
37
38
39
40
41
42
43
44
45
46
47
48
49
50
51
52
53
54
55
56
57
58
59
60
61
62
63
64
65
66
67
68
69
70
71
72
73
74
75
76
77
78
# 组件内路由守卫
前面的全局路由和独享路由都是基于路由本身来说的。我们说一下与路由对应的组件相关的守卫,我们常称为组件内路由守卫,它们在组件内部来使用的,非常像生命周期钩子。
通过路由规则进入该组件时会调用beforeRouteEnter(to, from, next),通过路由规则离开组件时会调用beforeRouteLeave(to, from, next)。一定要注意,是通过路由的方式,也就是<router-link>或者$router.push()让组件展示的,并不是使用组件标签调用的。
<template>
  <div>
    <ul>
      <li>news001<input /></li>
      <li>news002<input /></li>
      <li>news003<input /></li>
    </ul>
  </div>
</template>

<script>
export default {
  name: "News",
  // 通过路由规则进入组件时被调用
  beforeRouteEnter(to, from, next) {
    if (to.meta && to.meta.isAuth) {
      const jurisdiction = localStorage.getItem("jurisdiction");
      if (jurisdiction && jurisdiction === "pass") {
        next();
      } else {
        alert("您没有访问的权限!");
      }
    } else {
      next();
    }
  },
  // 通过路由规则离开组件时被调用,要与router.afterEach区分开
  // router.afterEach且成功切换到路由,beforeRouteLeave是离开组件,不一定成功去往了to的组件
  beforeRouteLeave(to, from, next) {
    console.log("to", to);
    console.log("from", from);
    next();
  },
};
</script>
2
3
4
5
6
7
8
9
10
11
12
13
14
15
16
17
18
19
20
21
22
23
24
25
26
27
28
29
30
31
32
33
34
35
# 3.10 history 模式和 hash 模式
Vue Router默认是hash 模式的,路径里会出现/#,它的好处是/#后面的路径在重新加载页面时不会传递给服务器,这样就不会导致请求不到资源而报错。而history 模式却是将端口号以后的完整路径传给服务器进行请求,如果请求不到资源就会报错,因为传递过来的其实是前端自己的路由地址,在服务端并没有该地址的接口处理或者没有该地址对应的资源就会报错。
import Vue from 'vue'
import Router from 'vue-router'
Vue.use(Router);

const router = new Router({
    mode: 'history', // 默认是hash模式,可以改为history模式
    routes: [...],
});
2
3
4
5
6
7
8
项目上线一般选择history 模式,至于服务端怎么处理就得借助中间件了。我们简单使用express做一下项目上线演示。
- 新建一个服务端项目
vue_express_test,然后在该项目里使用npm init初始化项目,然后使用npm i express安装express,再使用npm i connect-history-api-fallback。 - 在
vue_express_test项目的根目录下新建一个static目录和server.js文件,前者用于存放Vue 项目经过 build 后的静态文件,后者是用于启动项目。 - 在前端的 Vue 项目中运行
npm run build,会生成一个dist文件夹,将里面的东西全部复制到服务端项目的static里。 - 准备一下
server.js的内容后,在服务器端使用node server.js运行,然后在浏览器里输入localhost:5005就可以查看部署的前端页面了。
server.js:
const express = require("express");
const history = require("connect-history-api-fallback");
const app = express();
// 解决前端history模式下请求服务器报错的问题
app.use(history());
// 指定静态资源
app.use(express.static(__dirname + "/static"));
app.get("preson", (req, resp) => {
  resp.send({
    name: "张三",
    age: 18,
  });
});
app.listen(5005, (err) => {
  if (!err) console.log("服务器启动了");
});
2
3
4
5
6
7
8
9
10
11
12
13
14
15
16
总结拓展:
- 对于一个 url 来说,什么是 hash 值?——
#及其后面的内容就是 hash 值。 - hash 值不会包含在 HTTP 请求中,即:hash 值不会带给服务器。
- hash 模式:
- 地址永远带着
#号,不美观。 - 若以后将地址通过第三方手机 App 分享,若 App 校验严格,则地址会被标记为不合法。
- 兼容性好。
- 地址永远带着
- history 模式:
- 地址干净、美观。
- 兼容性相比于 hash 模式略差。
- 应用部署上线时需要后端人员支持,解决刷新页面服务端 404 的问题。