# Vue3
# 用 Vite 初始化项目
先创建项目
// 全局安装yarn(有就跳过,或者你想用npm)
npm install --global yarn
// 使用yarn和vite创建项目my-vue-app
yarn create vite my-vue-app --template vue
// npm方式
npm init vite@latest my-vue-app -- --template vue
2
3
4
5
6
然后使用npm install或者yarn下载项目的依赖包,最后可以看一下package.json里的scripts,运行npm run dev启动项目。
{
  "scripts": {
    "dev": "vite", // 启动开发服务器,别名:`vite dev`,`vite serve`
    "build": "vite build", // 为生产环境构建产物
    "preview": "vite preview" // 本地预览生产构建产物
  }
}
2
3
4
5
6
7
到谷歌网上应用商店 (opens new window)安装Vue.js devtools,图标里带个“beta”的是 Vue3 的开发者工具。右击“管理扩展程序”,选择“允许访问文件网址”。
走读一些文件:
index.html放在了根目录了,这个是由 Vite 决定的,本地开发时index.html作为入口,根据它里面的<script type="module" src="...">来动态解析模块。他是先启动服务后动态解析模块,而 webpack 是先解析模块后启动服务。main.js里最大改变是createApp,而 Vue2 是new Vue()(而且Vue已经引不进来了,只能使用createApp)。这个createApp是个工厂函数,用于创建应用实例。它的入参和new Vue()的入参一样是组件选项对象,但是它创建出来的实例很“轻”,你可以console.log打印一下实例。App.vue,这<template>里不再约束只能有一个根节点,现在可以看到它有同级的<img>和<HelloWorld>。
# 常用的 Composition API
# setup()和 script setup
Composition API 意思是组合式 API,以前 Vue2 是 Options API配置化 API,在 Vue3 初期版本还是存在配置项+Composition API 写法的,这是为了让开发者能平稳过渡。
setup 是一个函数,在组件选项对象属于一个新的配置项,与name等配置是同级的。它用于承载其他的 Composition API,组件中所用到的数据、方法、计算属性、监视属性、生命周期等都可以配置在setup里面。
<!-- MyBook.vue -->
<template>
  <div>{{ msg }}: {{ readersNumber }} || {{ book.title }}</div>
  <button type="button" @click="hello">点我</button>
</template>

<script>
import { ref, reactive } from "vue";
export default {
  props: {
    msg: String,
  },
  setup(props) {
    // data里的一些响应式数据
    const readersNumber = ref(0);
    const book = reactive({ title: "Vue 3 Guide" });
    // methods里的方法
    function hello() {
      alert("hello");
    }
    // 给<template>用的数据,必须return出去
    return { readersNumber, book, hello };
  },
};
</script>
2
3
4
5
6
7
8
9
10
11
12
13
14
15
16
17
18
19
20
21
22
23
24
25
不过,我本人并不推荐这种半 Options API 半 Composition API的写法。这些个 data、methods 要放在 setup 函数内部,最后还有个return返回一大串数据供template使用(代码过长你可能忘记 return 了)。它同级还有components、props等,如果你初次接触就会有些迷惑,到底哪些是配置式写法哪些要放到 setup 里组合起来写(可以两种方法混用,但setup里的更优先),这到底是在写 Vue2 还是在写 Vue3 呢?
我推荐<script setup>的写法(setup作为<script>一个属性),它是在 Vue3.2 时推出的,它的样板代码会少很多,没有了return等(这个 return 有点像 React 返回 jsx)。但是它需要你额外使用defineProps、computed、useContext等钩子。如果你学习过 React,就会发现它和函数式组件+hooks 的方案非常像。
<template>
  <div>{{ msg }}: {{ readersNumber }} || {{ book.title }}</div>
  <button type="button" @click="hello">点我</button>
</template>

<script setup>
import { ref, reactive } from "vue";

// 父组件传来的props数据
defineProps({ msg: String });
// data里的一些响应式数据
const readersNumber = ref(0);
const book = reactive({ title: "Vue 3 Guide" });
// methods里的方法
const hello = () => {
  alert("hello");
};
</script>
2
3
4
5
6
7
8
9
10
11
12
13
14
15
16
17
18
# ref()
上面例子中的readersNumber它是一个响应式数据。它使用了ref()这个新函数(这可不是节点中的 ref 属性),该函数返回的是一个对象(响应式引用)。这个对象有个value属性,是响应式数据的值,可以在 js 代码中拿到这个value进行修改,就能通知用到该数据的模板去 diff。
例如readersNumber.value = 1,这个有点像 React 中的setState()了。如果是在模板中就直接用该数据,不用.value。
<template>
  <!-- 不用.value,直接用 -->
  <div>姓名:{{ name }}</div>
  <button type="button" @click="handleClick">点我</button>
</template>

<script setup>
import { ref } from "vue";

const name = ref("张三");
// 需要.value
const handleClick = () => (name.value = "李四");
</script>
2
3
4
5
6
7
8
9
10
11
12
13
如果这响应式数据是个对象呢,在 js 中用的时候对象是有value的,它的属性就不需要使用value了
<template>
  <div>姓名:{{ obj.name }}</div>
  <button type="button" @click="handleClick">点我</button>
</template>

<script setup>
import { ref } from "vue";

const obj = ref({
  name: "张三",
  age: 18,
});
const handleClick = () => (obj.value.name = "李四");
</script>
2
3
4
5
6
7
8
9
10
11
12
13
14
如果你在控制台打印name和obj会发现,它们的 value 有些不一样,obj的value是个Proxy类型的对象,其实是通过 Vue3 提供的reactive()处理成Proxy对象的。
里传对象.99e8f487.png)
# reactive()
reactive()新函数一般用于声明一个对象类型(准确说是复杂类型)的响应式数据,而ref()大多声明一个基本类型的响应式数据。
reactive()新函数返回的是一个Proxy类型的对象,它如果在 js 中修改值就不需要value,因为它其实是个代理对象,通过代理对象.属性名就能拿到对应的属性值,具体下一节会讲 Proxy 代理,我们看一下reactive()使用的例子。
<template>
  <!-- 不用.value,直接用 -->
  <div>姓名:{{ obj.name }}</div>
  <div>{{ obj.a.b }} || {{ obj.a.c.d }}</div>
  <button type="button" @click="handleClick">点我</button>
</template>

<script setup>
import { reactive } from "vue";

const obj = reactive({
  name: "张三",
  a: {
    b: 1,
    c: {
      d: 2,
    },
  },
});
// 不用.value了,直接取这个属性
const handleClick = () => {
  obj.name = "李四";
  obj.a.b = 3; // 深层次的也能被监测到
  obj.a.c.d = 4; // 深层次的也能被监测到
};
</script>
2
3
4
5
6
7
8
9
10
11
12
13
14
15
16
17
18
19
20
21
22
23
24
25
26
我们再看一下reactive()里使用数组,返回的这个对象可以用索引修改某项,不再局限于“Vue2 中数组类型响应式数据只能使用 8 个方法来维持响应式”,也不用额外使用this.$set或者Vue.set了。
<template>
  <ul>
    <li v-for="item in arr" :key="item.id">名字:{{ item.name }}</li>
  </ul>
  <button type="button" @click="handleClick">点我</button>
</template>

<script setup>
import { reactive } from "vue";

const arr = reactive([
  { id: "1", name: "张三" },
  { id: "2", name: "李四" },
  { id: "3", name: "王五" },
]);
// 可以直接通过索引修改数组某项了,不用再通过this.$set了
const handleClick = () => {
  arr[0] = { id: "4", name: "赵六" };
};
</script>
2
3
4
5
6
7
8
9
10
11
12
13
14
15
16
17
18
19
20
# 简单说说 Vue3 的响应式
我们回顾一下 Vue2 的响应式,可以在 Vue.js 搜一下proxy或者initData,可以看到如下代码,源对象是this._data.xxx和this._props.yyy,而使用的代理对象是this.xxx和this.yyy,也就可以在 methods 等地方使用代理对象this.xxx和this.yyy,模板中使用就去掉了 this。而真正的响应式处理是下面第二段代码,用了一个 observer 观察者,在设置数据时会通知(dep.notify())模板去 diff。
/**
 * target是this也就是vm,sourceKey这里是_data(或者_props),key是xxx某个属性
 * 意思是让this.xxx作为this._data.xxx的代理对象。读取this.xxx的属性其实就是
 * 读取this._data.xxx的属性,设置this.xxx的属性其实就是设置this._data.xxx的属性
 */
function proxy(target, sourceKey, key) {
  // getter
  sharedPropertyDefinition.get = function proxyGetter() {
    return this[sourceKey][key];
  };
  // setter
  sharedPropertyDefinition.set = function proxySetter(val) {
    this[sourceKey][key] = val;
  };
  // 添加key,并设置特性
  Object.defineProperty(target, key, sharedPropertyDefinition);
}
// 上面这段代码是1.vue基础的“二、Vue的MVVM和数据代理”内容,下面这段代码是1.vue基础的“七、Vue的数据监视”内容

/**
 *  obj是this._data,key就是this._data.xxx,重点就是setter里的dep.notify()
 *  当开发人员修改this.xxx是也会让this._data.xxx修改(上面的代码试想的),又由于下面的
 *  代码,在this._data.xxx修改时会dep.notify()通知模板去diff根据结果来是否重新渲染页面
 */
function defineReactive$$1(obj, key, val, customSetter, shallow) {
  // 读取obj对象里key属性的特性
  var property = Object.getOwnPropertyDescriptor(obj, key);
  if (property && property.configurable === false) return;
  var getter = property && property.get;
  var setter = property && property.set;
  // val是重点,下面的getter和setter最后都是访问的val,它是中间量
  if ((!getter || setter) && arguments.length === 2) {
    val = obj[key];
  }
  // 多层级的对象暂时不考虑,这个会用到递归
  // var childOb = !shallow && observe(val);
  // 修改obj对象里key属性的特性
  Object.defineProperty(obj, key, {
    enumerable: true,
    configurable: true,
    get: function reactiveGetter() {
      return getter ? getter.call(obj) : val;
    },
    set: function reactiveSetter(newVal) {
      setter ? setter.call(obj, newVal) : (val = newVal);
      // 触发更新
      dep.notify();
    },
  });
}
2
3
4
5
6
7
8
9
10
11
12
13
14
15
16
17
18
19
20
21
22
23
24
25
26
27
28
29
30
31
32
33
34
35
36
37
38
39
40
41
42
43
44
45
46
47
48
49
50
看上面的代码你还可以明确一点,一切都是围绕着对象的属性来做文章的(而且只能 get 和 set,删除属性和追加属性就不行了),这也是数组类型的响应式对象使用索引去修改为什么不行,并且 Vue2 还重写了数组的那 8 个方法来实现响应式。
简单复习一下 Proxy 和 Reflect。const proxy = new Proxy(target, handler),target 是源对象,proxy 是代理对象,handler 是处理器对象。如果这个处理器对象是个{}空字面量对象的话,那就和上面function proxy(target, sourceKey, key)自定义函数一样,只是单纯的“数据转发”。这个 es6 提供的 Proxy 的优势在于,它是 es6 原生提供的函数,功能强大稳定(意思是不止能监视 get 和 set,还有 delete 等等方法),然后 target 可以是任何类型的对象(包括原生数组、函数,甚至另一个代理),Object.defineProperty其实只针对于对象的属性对于数组就爱莫能助了。
const arr = [
  { id: "1", name: "张三" },
  { id: "2", name: "李四" },
  { id: "3", name: "王五" },
];
const proxy = new Proxy(arr, {
  set(target, prop, val) {
    target[prop] = val;
    console.log("通知模板去diff");
    return true;
  },
});
proxy[0] = { id: "4", name: "赵六" };
console.log("arr", arr);
2
3
4
5
6
7
8
9
10
11
12
13
14
那么 Reflect 又是什么呢?它是一个反射,可以很方便对对象进行“增删改查”,其中对象本身的“查”和“改”很容易,而“增”和“删”就不是那么方便了,例如删除一个属性要使用delete obj.xxx,追加一个属性要Object.defineProperty(obj, 'xxx', { ... })。而 Reflect 比较统一:
const obj = { name: "张三" };
console.log("读取name属性值: ", Reflect.get(obj, "name"));
Reflect.set(obj, "name", "李四");
console.log("修改name属性值: ", obj.name);
console.log("删除name属性是否成功: ", Reflect.deleteProperty(obj, "name"));
console.log("name属性值: ", obj.name);
console.log(
  "新增age属性是否成功: ",
  Reflect.defineProperty(obj, "age", {
    get: () => 18,
  })
);
console.log("age属性值: ", obj.age);
2
3
4
5
6
7
8
9
10
11
12
13
Reflect 的第一个好处是多次Reflect.defineProperty不会报错并且返回结果,而Object.defineProperty(obj, 'xxx', { ... })多次就会报错得使用try catch进行异常捕获。Reflect 的第二个好处是,能用receiver处理this。
let user = {
  _name: "Guest",
  get name() {
    return this._name;
  },
};

let userProxy = new Proxy(user, {
  get(target, prop, receiver) {
    // return Reflect.get(target, prop, receiver)
    return target[prop]; // (*) target = user
  },
});

let admin = {
  __proto__: userProxy,
  _name: "Admin",
};

// 期望输出:Admin
console.log(admin.name); // 输出:Guest (?!?)
2
3
4
5
6
7
8
9
10
11
12
13
14
15
16
17
18
19
20
21
上面这个代码,admin.name通过原型找到 userProxy,通过代理找到 user 上的get name,而这个get name里的 this 自然就是上下文对象 user,那么就会输出user._name的值Guest。如果要 Reflect 进行代码修改*号那行就改为return Reflect.get(target, prop, receiver),这个receiver就会让实际的get name方法的this指向代理对象userProxy所在的上下文对象也就是admin,那么最后就会输出Admin。
Vue3 的相关源码可以搜function reactive
// 我们只看get/set
const set = /*#__PURE__*/ createSetter();
const get = /*#__PURE__*/ createGetter();
const mutableHandlers = {
  get,
  set,
  /* 省略... */
};
// 响应式数据
function reactive(target) {
  if (target && target["__v_isReadonly" /* IS_READONLY */]) {
    return target;
  }
  return createReactiveObject(target, false, mutableHandlers, mutableCollectionHandlers, reactiveMap);
}
// 生成响应式数据,看baseHandlers也就是上面的mutableHandlers
function createReactiveObject(target, isReadonly, baseHandlers, collectionHandlers, proxyMap) {
  /* 省略... */
  // 我们看targetType为1(Object和Array的场景),也就是baseHandlers
  const proxy = new Proxy(target, targetType === 2 /* COLLECTION */ ? collectionHandlers : baseHandlers);
  proxyMap.set(target, proxy);
  return proxy;
}
// 修改响应式数据时
function createSetter(shallow = false) {
  return function set(target, key, value, receiver) {
    /* 省略... */
    const result = Reflect.set(target, key, value, receiver);
    // 触发effect(通知模板等)
    trigger(target, "set" /* SET */, key, value, oldValue);
    return result;
  };
}
// 读取响应式数据时
function createGetter(isReadonly = false, shallow = false) {
  return function get(target, key, receiver) {
    /* 省略... */
    const res = Reflect.get(target, key, receiver);
    if (!isReadonly) {
      // 添加effect
      track(target, "get" /* GET */, key);
    }
    if (isRef(res)) {
      const shouldUnwrap = !targetIsArray || !isIntegerKey(key);
      return shouldUnwrap ? res.value : res;
    }
    if (isObject(res)) {
      return isReadonly ? readonly(res) : reactive(res);
    }
    return res;
  };
}
2
3
4
5
6
7
8
9
10
11
12
13
14
15
16
17
18
19
20
21
22
23
24
25
26
27
28
29
30
31
32
33
34
35
36
37
38
39
40
41
42
43
44
45
46
47
48
49
50
51
52
Proxy 不支持对基本类型数据进行代理,所以基本类型数据还是简单的 getter 和 setter,也就能解释之前的说的 ref 里传入对象,它的 value 是个 Proxy 类型,而基本类型的不是 Proxy 类型了。
最后解释一下:
trigger是触发 effect,track是添加 effect,这个effect的意思是副作用,这里是用于通知模板重新渲染等一些功能。- 至于副作用,是“函数外部环境发生的交互”,例如网络请求、DOM 操作、订阅数据来源、写入文件系统、获取用户输入等。
- 提到副作用就不得不提到纯函数,它有两个特点:
- 1)该函数不会对入参本身进行修改,必须得有 return 返回值;在相同的入参时,需产生相同的返回值。
- 2)该函数得没有副作用;返回值可以与入参无关(有关也可以),但是不能与入参以外的变量或者其他影响有关。
# computed()
计算属性用了computed()这个新函数,如果只有getter那就传递一个函数,使用这个计算属性时也需要.value(模板中不需要)。它是惰性的,意思是只在数据源发生改变时才执行里面的函数(多次访问计算属性,只要数据源没变就直接返回之前计算的值)。
<template>
  <div>counter: {{ counter }}</div>
  <div>newCounter: {{ newCounter }}</div>
  <button type="button" @click="handleClick">点我</button>
</template>

<script setup>
import { ref, computed } from "vue";

const counter = ref(0);
// 传递一个函数(getter)
const newCounter = computed(() => counter.value * 2);
const handleClick = () => {
  counter.value++;
};
</script>
2
3
4
5
6
7
8
9
10
11
12
13
14
15
16
如果还有setter那么就得传递一个对象,具体看下面这个例子
<template>
  <div>姓: {{ lastName }}</div>
  <div>名: {{ firstName }}</div>
  <div>全名: {{ fullName }}</div>
  <button type="button" @click="handleClick">点我</button>
</template>

<script setup>
import { ref, computed } from "vue";

const firstName = ref("三");
const lastName = ref("张");
// 传递一个对象(要包含getter和setter)
const fullName = computed({
  get: () => lastName.value + "|" + firstName.value,
  set: (value) => {
    const arr = value.split("|");
    if (arr.length === 2) {
      lastName.value = arr[0];
      firstName.value = arr[1];
    }
  },
});
const handleClick = () => {
  fullName.value = "李|四";
};
</script>
2
3
4
5
6
7
8
9
10
11
12
13
14
15
16
17
18
19
20
21
22
23
24
25
26
27
# watch()的十一种情况
说实话 Vue3 的watch()比较难玩,它在功效上和 Vue2 的watch几乎一样,只是在用法上变化很大,情况会比较复杂。原因一是ref和reactive,原因二是watch()扩展了参数的写法。
我们看一下watch()扩展参数的写法,wathc(数据, 回调函数),这个“数据”有三种写法
- 直接写ref 对象或者reactive 对象;
() => state.xxx,例如这种 getter 函数(getter/effect);[xxx, yyy],例如这种数据列表(数组)。
我们看下面演示的例子:
<template>
  <div>
    <span>数值: {{ count }}</span> || <button type="button" @click="handleClick1">点我</button>
  </div>
  <div>
    <span>名字: {{ lastName + firstName }}</span> || <button type="button" @click="handleClick2">点我</button>
  </div>
</template>

<script setup>
import { ref, watch } from "vue";

// 情况一:直接侦听ref
const count = ref(0);
watch(count, (count, prevCount) => {
  console.log("直接侦听ref。 count", count, ", prevCount: ", prevCount);
});

// 情况二:侦听一个getter(ref),注意count此时要带上.value
watch(
  () => count.value,
  (count, prevCount) => {
    console.log("侦听一个getter。 count: ", count, ", prevCount: ", prevCount);
  }
);
// 情况三:侦听一组ref
const firstName = ref("三");
const lastName = ref("张");
watch([firstName, lastName], (newValues, prevValue) => {
  console.log("名字改变了, newValues: ", newValues, ", prevValue: ", prevValue);
});
const handleClick1 = () => {
  count.value++;
};
const handleClick2 = () => {
  firstName.value += "?";
  lastName.value += "!";
};
</script>
2
3
4
5
6
7
8
9
10
11
12
13
14
15
16
17
18
19
20
21
22
23
24
25
26
27
28
29
30
31
32
33
34
35
36
37
38
39
- 情况一,直接侦听一个 ref,常用于侦听基本类型的响应式数据,不用带上
.value。 - 情况二,侦听一个 getter(ref),一般用于侦听ref 的 value。不太常用,一般直接用情况一就行了,不要多此一举。
- 情况三,侦听一组 ref,它们都不用带上
.value,多个同时被修改,也只触发一次回调。
以上三种情况还只是基本类型,也就是 ref 对象。如果涉及到复杂类型,又要分为 ref 对象和 reactive 对象,虽然不太推荐用ref()为对象创建响应式数据,但官方并没有对此做出约束。看一下演示例子。
<template>
  <div>
    <span>person1: {{ person1.name }} - {{ person1.age }} - {{ person1.mother.name }} - {{ person1.mother.age }}</span>
    || <button type="button" @click="handleClick1">点我1</button> ||
    <button type="button" @click="handleClick2">点我2</button>
  </div>
  <div>
    <span>person2: {{ person2.name }} - {{ person2.age }} - {{ person2.mother.name }} - {{ person2.mother.age }}</span>
    || <button type="button" @click="handleClick3">点我3</button> ||
    <button type="button" @click="handleClick4">点我4</button>
  </div>
  <div>
    <span>obj1.a: {{ obj1.a }} - obj1.b.c: {{ obj1.b.c }}</span> ||
    <button type="button" @click="handleClick5">点我5</button> ||
    <button type="button" @click="handleClick6">点我6</button>
  </div>
  <div>
    <span>obj2.d: {{ obj2.d }} - obj2.e.f: {{ obj2.e.f }}</span> ||
    <button type="button" @click="handleClick7">点我7</button> ||
    <button type="button" @click="handleClick8">点我8</button>
  </div>
</template>

<script setup>
import { reactive, watch } from "vue";

const person1 = reactive({
  name: "张三",
  age: 18,
  mother: { name: "李梅", age: 42 },
});
// 情况四:侦听一个reactive
watch(person1, (newValues, prevValue) => {
  console.log("侦听一个reactive。 newValues: ", newValues, ", prevValue: ", prevValue);
});
const person2 = reactive({
  name: "李四",
  age: 19,
  mother: { name: "王雪", age: 39 },
});
// 情况五:侦听一个getter(reactive)
watch(
  () => person2.age,
  (newValues, prevValue) => {
    console.log("侦听一个getter(reactive)。 newValues: ", newValues, ", prevValue: ", prevValue);
  }
);
const obj1 = reactive({ a: "a", b: { c: "c" } });
const obj2 = reactive({ d: "d", e: { f: "f" } });
// 情况六:侦听一组reactive
watch([obj1, obj2], (newValues, prevValue) => {
  console.log("侦听一组reactive。 newValues: ", newValues, ", prevValue: ", prevValue);
});
const handleClick1 = () => {
  person1.age++;
};
const handleClick2 = () => {
  person1.mother.age++;
};
const handleClick3 = () => {
  person2.age++;
};
const handleClick4 = () => {
  person2.mother.age++;
};
const handleClick5 = () => {
  obj1.a += "a";
};
const handleClick6 = () => {
  obj1.b.c += "c";
};
const handleClick7 = () => {
  obj2.d += "d";
};
const handleClick8 = () => {
  obj2.e.f += "f";
};
</script>
2
3
4
5
6
7
8
9
10
11
12
13
14
15
16
17
18
19
20
21
22
23
24
25
26
27
28
29
30
31
32
33
34
35
36
37
38
39
40
41
42
43
44
45
46
47
48
49
50
51
52
53
54
55
56
57
58
59
60
61
62
63
64
65
66
67
68
69
70
71
72
73
74
75
76
77
78
- 情况四,直接侦听一个 reactive,不管修改层次有多深的属性,它都能侦听到。
- 情况五,侦听一个 getter(reactive),一般用于侦听 reactive 对象的某个属性,这种很常见了。
- 情况六,侦听一组 reactive,类似情况四,它们其实有一个小问题。
情况四和情况六有个小问题,那就是回调函数里的newValues, prevValue两对象一直是同一个,你想要前一份状态值需要做一下优化。需要先深克隆一下源响应式对象,然后用 getter 返回这个新对象,情况七如下。
<template>
  <div>
    <span>obj1.a: {{ obj1.a }} - obj1.b.c: {{ obj1.b.c }}</span> ||
    <button type="button" @click="handleClick5">点我5</button> ||
    <button type="button" @click="handleClick6">点我6</button>
  </div>
  <div>
    <span>obj2.d: {{ obj2.d }} - obj2.e.f: {{ obj2.e.f }}</span> ||
    <button type="button" @click="handleClick7">点我7</button> ||
    <button type="button" @click="handleClick8">点我8</button>
  </div>
</template>

<script setup>
import { reactive, watch } from "vue";
// yarn add lodash@4
import cloneDeep from "lodash/cloneDeep";

const obj1 = reactive({ a: "a", b: { c: "c" } });
const obj2 = reactive({ d: "d", e: { f: "f" } });
// 情况七:侦听一组reactive,如果是person的话就是 () => cloneDeep(person)
watch(
  () => [cloneDeep(obj1), cloneDeep(obj2)],
  (newValues, prevValue) => {
    console.log("侦听一组reactive。 newValues: ", newValues, ", prevValue: ", prevValue);
  }
);
const handleClick5 = () => {
  obj1.a += "a";
};
const handleClick6 = () => {
  obj1.b.c += "c";
};
const handleClick7 = () => {
  obj2.d += "d";
};
const handleClick8 = () => {
  obj2.e.f += "f";
};
</script>
2
3
4
5
6
7
8
9
10
11
12
13
14
15
16
17
18
19
20
21
22
23
24
25
26
27
28
29
30
31
32
33
34
35
36
37
38
39
40
然后就是用ref()为对象创建响应式数据,在侦听它时,要么使用.value,要么就配上{ deep: true },情况八如下。
<template>
  <div>
    <span>person: {{ person.name }} - {{ person.age }} - {{ person.mother.name }} - {{ person.mother.age }}</span> ||
    <button type="button" @click="handleClick1">点我1</button> ||
    <button type="button" @click="handleClick2">点我2</button>
  </div>
</template>

<script setup>
import { ref, watch } from "vue";

const person = ref({
  name: "张三",
  age: 18,
  mother: { name: "李梅", age: 42 },
});
// 情况八:侦听一个“用ref()为对象创建响应式数据”。要么person.value,要么person + { deep: true }
watch(
  person,
  (newValues, prevValue) => {
    console.log("侦听。 newValues: ", newValues, ", prevValue: ", prevValue);
  },
  { deep: true }
);
const handleClick1 = () => {
  person.value.age++;
};
const handleClick2 = () => {
  person.value.mother.age++;
};
</script>
2
3
4
5
6
7
8
9
10
11
12
13
14
15
16
17
18
19
20
21
22
23
24
25
26
27
28
29
30
31
getter 的注意事项,其实看到这里可以跳过了,下面的情况很少见。上面的情况二里的 getter 是用于 ref 的value上的,上面的情况五里的 getter 是用于 reactive 的某层里某个属性的,上面的情况七里的 getter 是用于cloneDeep 后的对象。而如果 getter 直接用于 ref 或 reactive 对象本身的话,必须得配合{ deep: true },这与上面的情况八是同样的道理,情况九、十、十一演示如下。
<template>
  <div>
    <span>数值: {{ count }}</span> || <button type="button" @click="handleClick1">点我1</button>
  </div>
  <div>
    <span>person1: {{ person1.name }} - {{ person1.age }} - {{ person1.mother.name }} - {{ person1.mother.age }}</span>
    || <button type="button" @click="handleClick2">点我2</button> ||
    <button type="button" @click="handleClick3">点我3</button>
  </div>
  <div>
    <span>person2: {{ person2.name }} - {{ person2.age }} - {{ person2.mother.name }} - {{ person2.mother.age }}</span>
    || <button type="button" @click="handleClick4">点我4</button> ||
    <button type="button" @click="handleClick5">点我5</button>
  </div>
</template>

<script setup>
import { ref, reactive, watch } from "vue";

const count = ref(0);
// 情况九:侦听一个getter(ref),count没有带上.value,并且使用了deep: true
watch(
  () => count,
  (count, prevCount) => {
    console.log("侦听一个getter(ref)。 count: ", count, ", prevCount: ", prevCount);
  },
  { deep: true }
);
const person1 = reactive({
  name: "张三",
  age: 18,
  mother: { name: "李梅", age: 42 },
});
// 情况十:侦听一个getter(reactive),count没有带上.value,并且使用了deep: true
watch(
  () => person1,
  (newValues, prevValue) => {
    console.log("侦听一个getter(reactive)。 newValues: ", newValues, ", prevValue: ", prevValue);
  },
  { deep: true }
);
const person2 = ref({
  name: "李四",
  age: 19,
  mother: { name: "王雪", age: 39 },
});
// 情况十一:侦听一个getter(ref-对象),count没有带上.value,并且使用了deep: true
watch(
  () => person2,
  (newValues, prevValue) => {
    console.log("侦听一个getter(reactive)。 newValues: ", newValues, ", prevValue: ", prevValue);
  },
  { deep: true }
);
const handleClick1 = () => {
  count.value++;
};
const handleClick2 = () => {
  person1.age++;
};
const handleClick3 = () => {
  person1.mother.age++;
};
const handleClick4 = () => {
  person2.value.age++;
};
const handleClick5 = () => {
  person2.value.mother.age++;
};
</script>
2
3
4
5
6
7
8
9
10
11
12
13
14
15
16
17
18
19
20
21
22
23
24
25
26
27
28
29
30
31
32
33
34
35
36
37
38
39
40
41
42
43
44
45
46
47
48
49
50
51
52
53
54
55
56
57
58
59
60
61
62
63
64
65
66
67
68
69
70
情况九、十、十一,getter 里直接返回一个 ref 对象或者 reactive 本身,一般是需要开启{deep: true}。这三种情况比较少见,因为用前面的情况可以替代,这里只是作为陷阱来讲的。
总结一下watch()的用法:
- 如果侦听的响应式数据是基本类型,那么
watch()的第一个形参直接用ref 对象本身就可以了,也就是情况一。(如果你非要.value那就搭配 getter 用法,也就是情况二)。 - 如果侦听的响应式数据是复杂类型整体,那么
watch()的第一个形参直接用reactive 对象本身就可以了(它相当于自动开启了{deep:true},如果你尝试手动用{deep:false}这是关闭不了的),也就是情况四。 - 如果侦听的响应式数据是复杂类型的某个属性,那么
watch()的第一个形参用 getter 配合 reactive 对象即可,也就是情况五。 - 如果侦听的响应式数据是复杂类型整体并且还想知道它前一次的状态值,那么就需要 getter 配合 reactive 对象的深克隆对象,也就是情况七。
- 如果想一次性侦听多个,那么
watch()的第一个形参是一个数组,数组每一项最好是 ref 对象或者 reactive 对象或者 reactive 对象的克隆对象,具体情况看前面的描述。这一条是情况三和情况六 - 至于其他情况,也就是情况八、九、十、十一或者其他衍生出来的情况,它们都能用前面的方式进行替代或者优化。
# watchEffect()
其实上一节的watch()更像 React 的useEffect()。
watchEffect()和watch()是同一个功能的两种不同形态,底层的实现是一样的,大致区别如下
watch():- 显式指定依赖源(手动指定),依赖源更新时执行回调函数。
- 不过它是惰性的,多个依赖源修改时,一般只触发一次回调函数(用 nextTick 可以多次)。
- 可以立即执行回调函数,但必须手动加上
{immediate: true}。
watchEffect():- 自动收集依赖源(不用手动指定依赖项),依赖源更新时重新执行自身。
- 多个依赖源修改时,有几次修改就调用几次。
- 并且回调函数是立即执行,相当于
{immediate: true}(不用手动加)。 - 在组件卸载时自动停止侦听,不仅如此还能手动停止。
- 还能使用清除函数(失效回调),在卸载时执行一次清除函数,也在副作用即将重新执行时调用一次清除函数(这个和 React 的
useEffect返回一个清除函数很像,只不过 Vue3 不是返回,而是形参)。 - 最后还能将回调函数调整到组件更新后再执行,需要在
watchEffect()的第二个参数上写{flush: 'post'}(默认是{flush: 'pre'}也就是 update 前执行的),像 React 就不能调整,它是默认 updated 后执行。
具体讲解如下(就理解为watch和watchEffect是 React 的useEffect拆分出来的两个功能把):
watchEffect()依赖源的收集,以及回调函数的立即执行代码如下。watchEffect( // 回调函数默认立即执行一次 () => console.log(counter.value) // 这里就是依赖项counter,但是是Vue3自动帮你收集的 ); // 与上面的基本等价 watch( () => counter.value, // 这里手动指定依赖是counter () => console.log(counter.value), { immediate: true } // 如果要立即执行一次,必须手动指定{ immediate: true } );1
2
3
4
5
6
7
8
9
10多个依赖源修改时,
watchEffect()与watch()的区别。推荐在大部分时候用watch()显式的指定依赖以避免不必要的重复触发,也避免在后续代码修改或重构时不小心引入新的依赖。const counter = ref(0); const enabled = ref(false); watchEffect(() => { if (enabled.value) console.log(counter.value); }); // (以下忽略 nextTick) // watchEffect 会被立即执行,因为 “enabled“ 为 false, 此时仅收集到 “enabled“ 依赖 counter.value += 1; // 无反应 enabled.value = true; // Effect 触发,控制台出 "1" counter.value += 1; // “counter“ 被作为新的依赖被收集,控制台出 "2" enabled.value = false; // 函数被重新执行,无输出 counter.value += 1; // 函数被重新执行,无输出 (虽然 counter 已经没有用了,但是作为依赖还是会触发函数)1
2
3
4
5
6
7
8
9
10
11
12
13
14
15
16
17watchEffect()组件卸载时自动停止侦听,也能手动停止。watch()做不到手动停止,watchEffect()的这种场景用的比较少。const stop = watchEffect(() => { /* ... */ }); // later stop();1
2
3
4
5
6watchEffect()清除函数(失效回调)的使用场景。onInvalidate是watchEffect()的形参,而onInvalidate的入参就是我们声明的一个清除函数(失效回调),它会在组件卸载前执行一次,也会在副作用每次执行前调用一次,这就能保证先取消订阅后更新订阅。(这个和 React 的useEffectreturn 一个清除函数很像,只不过 Vue3 里不是 return,而是形参)
import { reactive, watch, watchEffect } from "vue";
const friend = reactive({ id: 1 });
let prevFriendId = friend.id;
watch(
  () => friend.id,
  (newValue, prevValue) => {
    prevFriendId = prevValue;
  }
);
// 唯一不方便的就是旧值得额外用prevFriendId存储。如果只用watch(),那就还需要onUnmounted()钩子(vue2的beforeDestroy)
watchEffect((onInvalidate) => {
  ChatAPI.subscribeToFriendStatus(friend.id, handleStatusChange);
  // 除了这种场景,也可用来清除(中断)上一次请求,source.cancel('trigger')
  onInvalidate(() => {
    ChatAPI.unsubscribeFromFriendStatus(prevFriendId, handleStatusChange);
  });
});
2
3
4
5
6
7
8
9
10
11
12
13
14
15
16
17
# Vue3 的生命周期钩子
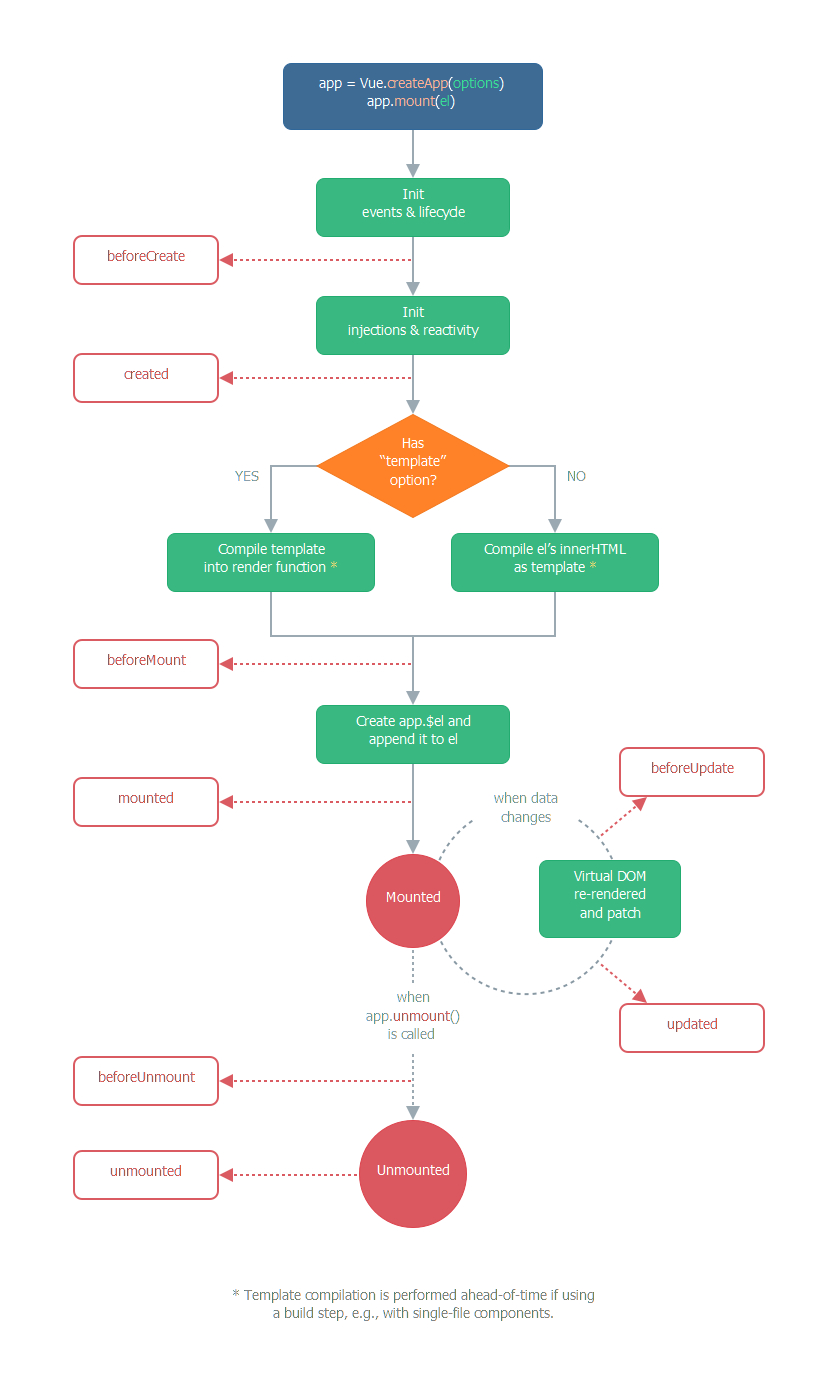
| 选项式 API | Hook inside setup |
|---|---|
| beforeCreate | Not needed* |
| created | Not needed* |
| beforeMount | onBeforeMount |
| mounted | onMounted |
| beforeUpdate | onBeforeUpdate |
| updated | onUpdated |
| beforeUnmount | onBeforeUnmount |
| unmounted | onUnmounted |
| errorCaptured | onErrorCaptured |
| renderTracked | onRenderTracked |
| renderTriggered | onRenderTriggered |
| activated | onActivated |
| deactivated | onDeactivated |
Not newded*:因为setup是围绕beforeCreate和created生命周期钩子运行的,所以不需要显式地定义它们。换句话说,在这些钩子中编写的任何代码都应该直接在setup函数中编写。
# toRef()和 toRefs()
toRef()创建一个 ref 对象,它的 value 值是另一个响应式对象的某个 property 属性。这个创建出来的 re 对象会保持对其源 property 的响应式连接。toRef()用的最多的是,将某个属性单独传递给外部,自定义 Hooks 中用的多。
const state = reactive({
  foo: 1,
  bar: 2,
});
// 第一个参数是源响应式对象,第二个参数是属性名
const fooRef = toRef(state, "foo");

// fooRef和state.foo的响应式连接一直存在
fooRef.value++;
console.log(state.foo); // 2

// fooRef和state.foo的响应式连接一直存在
state.foo++;
console.log(fooRef.value); // 3
2
3
4
5
6
7
8
9
10
11
12
13
14
toRef()是处理单个,而toRefs()是处理源响应式对象所有的第一层属性。
const state = reactive({
  foo: 1,
  bar: 2,
});
const { foo, bar } = toRefs(state); // 在自定义hooks中用的特别多,可以只返回一部分响应式的数据

// ref 和原始 property 已经“链接”起来了
state.foo++;
console.log(foo.value); // 2

foo.value++;
console.log(state.foo); // 3
2
3
4
5
6
7
8
9
10
11
12
# 自定义 hook
自定义 hook 在 React 中非常常见,Vue3 中初次使用会比较陌生,但其实很简单,看下面这个例子。
import { reactive, onMounted, onUnmounted } from "vue";
// 自定义hook,点击时获取坐标
export const usePoint = () => {
  const point = reactive({
    x: 0,
    y: 0,
  });
  const savePoint = (e) => {
    point.x = e.pageX;
    point.y = e.pageY;
    console.log("point:", point.x, point.y);
  };
  onMounted(() => {
    window.addEventListener("click", savePoint);
  });
  onUnmounted(() => {
    window.removeEventListener("click", savePoint);
  });
  // 最后返回有效数据
  return point;
};
2
3
4
5
6
7
8
9
10
11
12
13
14
15
16
17
18
19
20
21
<template>
  <div>
    <span>{{ point.x }}, {{ point.y }}</span>
  </div>
</template>

<script setup>
import { ref, watchEffect } from "vue";
import { usePoint } from "./hook.js";
// 使用自定义钩子
const point = usePoint();
</script>
2
3
4
5
6
7
8
9
10
11
12
# 其他 Composition API
# shallowReactive()和 shallowRef()
shallow 的意思是“浅的”,shallowReactive()和shallowRef()会生成浅响应式数据。对于shallowReactive(),它的“浅”表示只让 reactive 对象的第一层属性具有响应式。
<template>
  <div>
    <span>person: {{ person.name }} - {{ person.age }} - {{ person.mother.name }} - {{ person.mother.age }}</span> ||
    <button type="button" @click="handleClick1">点我1</button> ||
    <button type="button" @click="handleClick2">点我2</button>
  </div>
</template>

<script setup>
import { shallowReactive } from "vue";

const person = shallowReactive({
  name: "张三",
  age: 18,
  mother: { name: "李梅", age: 42 },
});
const handleClick1 = () => {
  person.age++;
}; // 页面正常更新
const handleClick2 = () => {
  person.mother.age++;
}; // 页面没反应
</script>
2
3
4
5
6
7
8
9
10
11
12
13
14
15
16
17
18
19
20
21
22
23
对于shallowRef(),它的“浅”表示只让 ref 对象的value 本身这个值具有响应式。基本类型的场景,.value就是基本类型的值(数值、布尔值、字符串);而复杂类型场景,.value是一个指向对象的地址值,指向的这个对象并不是 Proxy 类型,也就是说.value它指向的对象不再具有响应式。
<template>
  <div>
    <span>person: {{ person.name }} - {{ person.age }} - {{ person.mother.name }} - {{ person.mother.age }}</span> ||
    <button type="button" @click="handleClick1">点我1</button> ||
    <button type="button" @click="handleClick2">点我2</button>
  </div>
</template>

<script setup>
import { shallowRef } from "vue";

const person = shallowRef({
  name: "张三",
  age: 18,
  mother: { name: "李梅", age: 42 },
});
const handleClick1 = () => {
  person.value.age++;
}; // 修改对象里面的某些属性,页面没反应
const handleClick2 = () => {
  // 将value指向的对象完全替换成新的,页面响应了
  person.value = {
    name: "李四",
    age: 19,
    mother: { name: "王雪", age: 39 },
  };
};
</script>
2
3
4
5
6
7
8
9
10
11
12
13
14
15
16
17
18
19
20
21
22
23
24
25
26
27
28
最后说一下,shallowRef(),ref 对象的.value一直是一个值,可以是基本类型数据的值,也可以是一个对象的地址值,只要修改值那就是响应式的,如果是修改.value指向的对象里的某些属性那就不会响应。修改对象地址值就是替换一个新对象,这与修改对象的某些属性并不一样,也就是“浅”的表现之处。shallowRef()与ref()的区别就是.value指向的对象一个是普通对象类型,另一个是 Proxy 类型的。
# readonly()和 shallowReadonly()
readonly()返回原始对象的只读代理,这个原始对象可以是普通对象、ref 对象或 reactive 对象。不允许修改对象里的属性值。而shallowReadonly()是只限制对象第一层属性不允许被修改,其他深层次的是可以被修改的。经常用于做数据隔离,如果强制修改会在控制台还有警告提示,比如拖拽表格并且表格里有 input 等输入表单项。
const original = reactive({ count: 0 });

const copy = readonly(original);

watchEffect(() => {
  // 用于响应性追踪
  console.log(copy.count);
});

// 变更 original 会触发依赖于副本的侦听器
original.count++;

// 变更副本将失败并导致警告
copy.count++; // 警告!
2
3
4
5
6
7
8
9
10
11
12
13
14
# toRaw()和 markRaw()
toRaw()返回reactive()或readonly()代理的原始对象。请谨慎使用toRaw(),它直接操作原始对象,虽然在一定程度上避开了“响应”,但意外修改它可能会引起 BUG。
const foo = {};
const reactiveFoo = reactive(foo);
console.log(toRaw(reactiveFoo) === foo); // true
2
3
markRaw()标记一个对象,使其永远不会转换为 proxy(不会被用于响应式),最后返回对象本身。markRaw()常用于标记一些第三方类库引用对象,或者用于不可变数据的大列表,也就说一些对象是没必要进行响应式 proxy 处理的,可防止开发人员意外设置它们为响应式。
const foo = markRaw({});
// isReactive():检查对象是否是由reactive()创建的响应式数据
console.log(isReactive(reactive(foo))); // false

// 嵌套在其他响应式对象中
const bar = reactive({ foo });
console.log(isReactive(bar.foo)); // false
2
3
4
5
6
7
# customRef()
customRef()用于创建一个自定义的 ref 对象,可以在 ref.value 设置值(setter)和读取值(getter)时加入自定义逻辑。customRef()的入参是一个函数,该函数有两个形参,第一个形参track在 getter 内部用于“放行”(其实是添加 effect),第二形参trigger在 setter 内部用于“放行”(其实是触发 effect),函数返回一个对象,该对象有get和set属性(getter 和 setter)。一个延迟显示的例子如下:
<template>
  <div>
    <input v-model="inputValue" /><span>{{ delayShow }}</span>
  </div>
</template>

<script setup>
import { ref, watchEffect } from "vue";

// 输入框里的值
const inputValue = ref(0);

// 输入框后面的span展示值,要求是隔一秒再更新,这个防抖函数可以封装成一个自定义hook
const delayShow = useDebouncedRef(inputValue.value, 1000);

watchEffect(() => {
  delayShow.value = inputValue.value;
});
</script>

<script>
import { customRef } from "vue";
// 自定义hook
function useDebouncedRef(value, delay = 200) {
  let timeout;
  return customRef((track, trigger) => {
    return {
      get() {
        track();
        return value;
      },
      set(newValue) {
        clearTimeout(timeout);
        timeout = setTimeout(() => {
          value = newValue;
          trigger();
        }, delay);
      },
    };
  });
}
</script>
2
3
4
5
6
7
8
9
10
11
12
13
14
15
16
17
18
19
20
21
22
23
24
25
26
27
28
29
30
31
32
33
34
35
36
37
38
39
40
41
42
# triggerRef()
手动执行与shallowRef关联的任何作用 (effect)。
const shallow = shallowRef({ greet: 'Hello, world' }) // 第一次运行时记录一次 "Hello, world" watchEffect(() => {
console.log(shallow.value.greet) }) // 这不会触发作用 (effect),因为 ref 是浅层的 shallow.value.greet = 'Hello,
universe' // 记录 "Hello, universe",意思是会执行watchEffect里的回调函数 triggerRef(shallow)
2
3
# provide()和 inject()
和 vue2 的 provide/inject 功效差不多,可以传响应式数据并且数据更安全了,比如可以用readonly()对数据进行限制(或者shallowRef等)。
<template>
  <MyMarker />
</template>

<script setup>
import { ref, reactive, readonly, provide } from "vue";
import MyMarker from "./MyMarker.vue";
const location = ref("North Pole");
const geolocation = reactive({
  longitude: 90,
  latitude: 135,
});
// 修改location的方法
const updateLocation = () => {
  location.value = "South Pole";
};
// 将孙组件想要的location和geolocation传递过去,传递是我们用readonly做
// 限制,不允许直接修改数据源,只允许使用传递的updateLocation方法进行修改
provide("location", readonly(location));
provide("geolocation", readonly(geolocation));
provide("updateLocation", updateLocation);
</script>
2
3
4
5
6
7
8
9
10
11
12
13
14
15
16
17
18
19
20
21
22
<template>
  <div>
    <div>location: {{ userLocation }}</div>
    <div>longitude: {{ userGeolocation.longitude }}</div>
    <div>latitude: {{ userGeolocation.latitude }}</div>
    <button @click="updateUserLocation">点我</button>
  </div>
</template>

<script>
import { inject } from "vue";

export default {
  setup() {
    // 接收祖先节点的provide,第二个参数是默认值
    const userLocation = inject("location", "The Universe");
    const userGeolocation = inject("geolocation");
    const updateUserLocation = inject("updateLocation");

    return {
      userLocation,
      userGeolocation,
      updateUserLocation,
    };
  },
};
</script>
2
3
4
5
6
7
8
9
10
11
12
13
14
15
16
17
18
19
20
21
22
23
24
25
26
27
# isRef、isReactive、isReadonly、isProxy、unref
响应式数据判断:
isRef():检查一个值是否是一个 ref 对象。isReactive():检查一个对象是否由reactive()创建的代理。isReadonly():检查一个对象是否由readonly()创建的只读代理。isProxy():检查一个对象是否由reactive或者readonly创建的代理。unref():是val = isRef(val) ? val.value : val的语法糖函数。unref中的 r 确实是小写。